Chapter 6: Working with Forms and Validators
Form handling is one of those areas that at first glance appears very simple but in real applications can quickly become rather complicated. There are generally two approaches to dealing with forms. The first is to code all your forms, validation, and logic manually to give you complete control over how your forms work. The alternative approach is to use a form framework where ready-made classes exist for each of the field types you might want to use. The form framework then automates the generation of HTML, the validation of data, and the display of error messages for you.
At first glance, it might appear that a form framework would save you a lot of time, but in reality, form frameworks are rarely flexible enough to deal with all the situations you might want to develop, and in the long run you can sometimes find yourself spending more time creating custom fields for your form framework than it would have taken if you had coded all your forms manually.
Because of this, Pylons encourages you to do a lot of the work of generating forms yourself, but it does provide four sets of tools to make form handling as painless as possible:
- Form helpers to generate the HTML for common field types
- Validators to validate form data and convert between HTML and Python representations of particular data types
- HTML Fill to take an HTML form and automatically populate it with values and error messages for redisplaying the form data
- The @validate decorator to automate the process of validating a form and redisplaying it if it contains invalid data
These four tools can help make handling forms much simpler without in any way constraining your creativity as a developer. Pylons does support an alternative approach with a tool, called ToscaWidgets, although it won’t be covered in this chapter. ToscaWidgets is a full form framework developed from the original widgets code in TurboGears that automates every aspect of form handling. ToscaWidgets is still officially in prerelease, but if you are interested in its approach, you should visit http://toscawidgets.org to find out more. The majority of developers prefer the flexibility of the approach you’ll use in this chapter.
The Basics
When a user submits a form on a web site, the data is submitted to the URL specified in the action attribute of the <form> tag. The data can be submitted either via HTTP GET or POST as specified by the method attribute of the <form> tag. If your form doesn’t specify an action, then it’s submitted to the current URL, but generally you’ll want to specify an action attribute.
This is a simple form coded in HTML and without any Pylons-specific features:
<form name="test" method="get" action="/formtest/submit">
Email Address: <input type="text" name="email" />
               <input type="submit" name="submit" value="Submit" />
</form>
If your form contains a file upload field such as <input type="file" name="myfile" />, you will also need to specify an enctype="multipart/form-data" attribute, and you have to choose the post method.
Many people put the value of the method attribute in uppercase. If your HTML page uses XHTML, the method attribute value is supposed to be lowercase, which is why in this example it is specified as method="get", not method="GET", as many examples will show.
Later in the chapter, you’ll see how you can improve this example by using the h.url_for() helper in the form action and by using Pylons’ field helpers to generate most of the HTML for the form automatically. First, though, let’s create a new Pylons project to test this example as it stands:
$ paster create --template=pylons FormDemo
Accept the default options by pressing Enter to choose Mako as the template engine and no SQLAlchemy or Google App Engine support.
Once the project has been created, let’s create a simple template in FormDemo/formdemo/templates/base.html to use as a basis for the examples in this chapter:
<html>
<head>
<title>FormDemo</title>
</head>
<body>
${next.body()}
</body>
</html>
Create a new template called simpleform.html with the following content to test the example form:
<%inherit file="/base.html" />
<h1>Enter Your Email Address</h1>

<form name="test" method="get" action="/formtest/submit">
Email Address: <input type="text" name="email" />
               <input type="submit" name="submit" value="Submit" />
</form>
You’ll remember from the previous chapter that the <%inherit> tag allows the body of a template to be inserted into a parent template.
Now create a new controller called formtest:
$ cd FormDemo
$ paster controller formtest
Add two actions to the controller that look like this:
def form(self):
    return render('/simpleform.html')

def submit(self):
    return 'Your email is: %s' % request.params['email']
Start the server:
$ paster serve --reload development.ini
Visit http://localhost:5000/formtest/form, and you will see the form. In this case, the generated HTML looks like this:
<html>
<head>
<title>FormDemo</title>
</head>
<body>

<h1>Enter Your Email Address</h1>

<form name="test" method="get" action="/formtest/submit">
Email Address: <input type="text" name="email" />
               <input type="submit" name="submit" value="Submit" />
</form>

</body>
</html>
Try entering the e-mail address test@example.com and clicking Submit. The URL should change to http://localhost:5000/formtest/submit?email=test%40example.com&submit=Submit, and you should see the text Your email is: test@example.com.
Pylons has parsed and decoded the query string and set up the request.params object you saw in Chapter 3. As you’ll recall, this object behaves a bit like a dictionary where the keys are the names of the fields in the form, and their corresponding values are Unicode strings, with all the characters in the query string properly decoded ready for you to use. If you have two fields with the same name in the form, then using the dictionary interface will return the first string. You can get all the strings returned as a list by using the .getall() method. If you expect only one value and want to enforce this, you should use .getone(), which raises an error if more than one value with the same name is submitted. By default, if a field is submitted without a value, the dictionary interface returns an empty string. This means that using .get(key, default) on request.params will return a default only if the value was not present in the form.
POST vs. GET
Forms can be submitted using either GET or POST HTTP methods depending on the value you set for the method attribute of the <form> tag. The GET method results in the form data being sent to the server via the URL query string, and the POST method sends the data as part of the HTTP body. Figure 6-1 and Figure 6-2 show the LiveHTTPHeaders information for both types of requests.
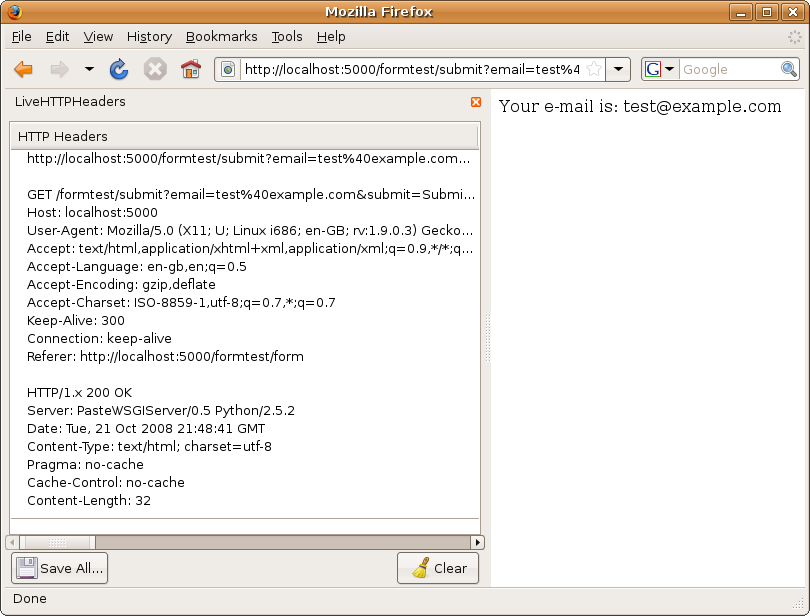
Figure 6-1. A GET request in LiveHTTPHeaders
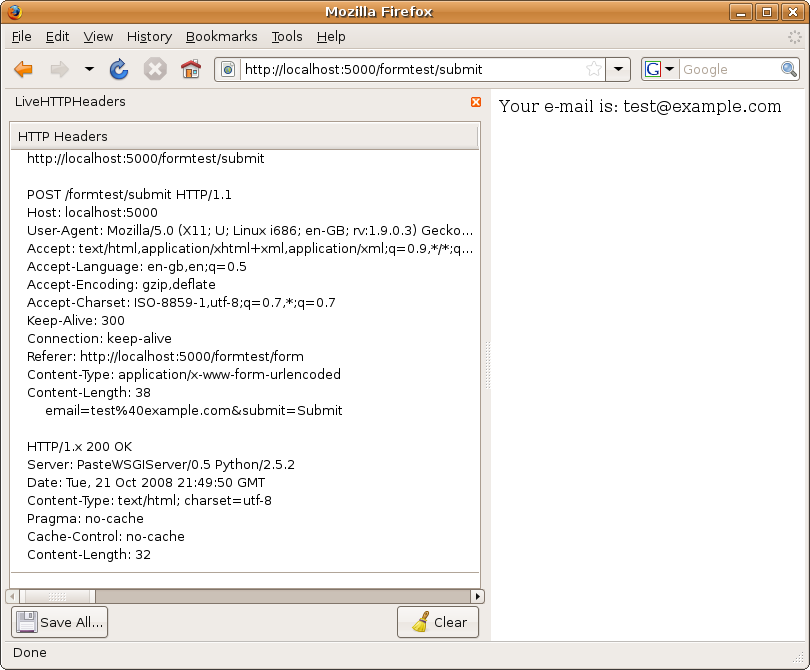
Figure 6-2. A POST request in LiveHTTPHeaders
As you can see, the request method (in the first line of both figures) is different in each. You’ll also see that the POST request has the e-mail address sent as extra content in the body rather than as part of the URL. It is possible to send very large amounts of data in the request body, but most browsers and servers can cope only with URLs that are less than 1,024 characters in length. This is why if you are using a file upload field, you should use the POST method, because the data is then sent in the body of the request.
You can test the POST method by editing the simpleform.html template so that the method is changed to post. If you rerun the example, you will see the same message is displayed as before, but the URL displayed in the browser after you submit the form is simply http://localhost:5000/formtest/submit without the query string. If you are writing forms that contain password fields, you should usually use POST to prevent the password from being visible to anyone who might be looking at the user’s screen. If you are ever in any doubt as to which method to use in a particular circumstance, it is normally safer to use POST.
Regardless of whether the form data is submitted as a GET or a POST request, Pylons still makes the values available in your controllers using the same interface through request.params.
You might be wondering how Pylons copes if you submit a form with a POST method to a URL containing a query string. The answer is that both sets of values get merged into the request.params object. Occasionally you might want to access the query string data separately from the POST data, so Pylons also provides two other MultiDict objects that behave in the same way as request.params to allow you to do just that. They are accessed as request.GET and request.POST, respectively.
The Resubmitted Data Problem
When writing form-based applications, you will occasionally find that users will press Refresh immediately after submitting a form. This has the effect of repeating whatever actions were performed the first time the form was submitted, but this might not always be the behavior your users expect.
If your form was submitted with a POST, most browsers will display a message to the user asking them whether they want to resubmit the data (see Figure 6-3). This will not happen with a GET, so POST is preferable to GET in those circumstances.
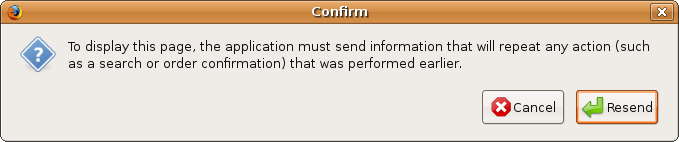
Figure 6-3. The dialog box displayed by Firefox when you click Refresh on a page where POST data has been submitted
Of course, the best way to solve this issue is to structure your code in such a way that if the user refreshes the page, the data isn’t resubmitted. Here’s one way of achieving this with an HTTP redirect:
# in the controller

    def form(self):
        return render('/simpleform.html')

    def submit(self):
        # Code to perform some action based on the form data
        # ...
        h.redirect_to(controller='formtest', action='result')

    def result(self):
        return 'Your data was successfully submitted.'
This code requires the use of the redirect_to() helper. Add the following import to the project’s lib/helpers.py file:
from pylons.controllers.util import redirect_to
Then in the controller, import the helpers module by adding this line at the top:
import formdemo.lib.helpers as h
Now you can test the controller. In this case, once the form is submitted, the data is saved, and an HTTP redirect occurs so that the browser redirects to http://localhost:5000/formtest/result. If the user then refreshes the page, it simply redisplays the message rather than reperforming the action.
One issue with this approach is that if you want to display some of the submitted data, you will need to load it again in the result() action because the request that calls that action doesn’t contain any of the submitted data. In Chapter 8, I’ll cover how these sorts of messages can be displayed by storing information in a session store.
Building Forms with Helpers
Forms can also be created with Pylons’ built-in helpers. You’ve already seen the helpers in Chapter 3 and learned about how they escape data to avoid security problems in Chapter 5; in this section, you’ll learn how to use the HTML helpers to create forms.
Note
The WebHelpers package from which the Pylons helpers are imported changed significantly in version 0.6. All the old helpers from Rails were deprecated in favor of the new-style literal approach documented in Chapter 5. All the JavaScript integration with Prototype and Script.aculo.us was also removed because the majority of developers preferred to use their own JavaScript framework. You’ll learn more about Pylons integration with JavaScript frameworks in Chapter 15.
Let’s update the form you’ve been working on to use some of the HTML form helpers. Change the simpleform.html file to look like this:
<%inherit file="/base.html" />
<h1>Enter Your E-mail Address</h1>

${h.form(h.url_for(controller='formtest', action='submit'), method='get')}
Email Address: ${h.text('email')}
               ${h.submit('submit', 'Submit')}
${h.end_form()}
You can see that you are using the form(), url_for(), text(), and submit() helpers. The url_for() helper actually comes from Routes, but the other helpers come from the webhelpers.html.tags module. You’ll need to add all these helpers to your sample project’s lib/helpers.py file too in order for this example to work:
from routes import url_for
from webhelpers.html.tags import *
The built-in form helpers simply generate fragments of HTML to help you build forms. There are no built-in checks to ensure that you have closed an open form tag, so it is up to you to ensure that you produce valid HTML. Of course, this is actually very useful because it gives you a lot of flexibility. For example, you are free to mix and match HTML and helpers in whichever way you see fit, or you could even define the start of a form in one template and the end of a form in another without the helpers getting in your way. The helpers do correctly escape any string or Unicode values you pass them, but they don’t modify any values that have already been escaped with literal().
It is worth becoming familiar with the form helpers available because using them can save a lot of time (particularly with more complex fields such as selects), and they will also ensure all your data is properly escaped. The HTML helpers are well documented at http://docs.pylonshq.com/thirdparty/webhelpers/html/html/#webhelpers-html-tags, so you can always refer to the documentation for the details of how a particular helper works.
Let’s take a look at the definition of the text() helper as an example:
text(name, value=None, **attrs)
This creates a standard text field. value is a string, the content of the text field. The following are the options:
- disabled
- If set to True, the user will not be able to use this input.
- size
- This is the number of visible characters that will fit in the input.
- maxlength
- This is the maximum number of characters that the browser will allow the user to enter.
The remaining keyword options are standard HTML options for the tag.
All form helpers start with a name argument, which should be a string representing the name of the field, and they also have an **attrs argument. In Python, ** is a notation that means that any extra keyword arguments passed to the function should be put in a dictionary called attrs where the keys are the parameter names and the values are their corresponding values.
Any extra parameters you pass to any of these helpers are treated as extra attributes to be added to the HTML tag generated. Here’s an example where you specify an attribute that isn’t part of the HTML specification to an <input> field. Again, the helpers won’t flag this as an error; it is up to you to decide what is right for your application and be responsible for the attributes you set.
>>> h.text('test', 'Welcome', myattribute='myvalue')
'<input type="text" value="Welcome" myattribute="myvalue" />'
One common use for this functionality is to specify the CSS class the field should have. The problem is that class is a reserved word in Python, so to specify the class attribute, you need to pass in the parameter class_ with a trailing _ character.
>>> h.text('test', 'Welcome', class_='wide')
'<input type="text" value="Welcome" class="wide" />'
The text() helper has a special behavior for the attributes disabled, size, and maxlength. All the single value field helpers behave in a similar way. They are checkbox(), file(), hidden(), image(), password(), radio(), submit(), and textarea().
There is also a select() helper, and it behaves slightly differently. If you look at the documentation for select(), you’ll see it is defined like this:
select(name, selected_values, options, **attrs)
Instead of taking a value argument, it has a selected_values argument and an options argument:
- selected_values
- A string or list of strings or integers giving the value(s) that should be preselected.
- options
An iterable of (value, label) pairs. The value is what is returned to the application if this option is chosen; the label is what is shown in the form. You can also pass an iterable of strings, in which case the labels will be identical to the values.
If you are used to the select() helper from an earlier version of WebHelpers, you might expect to be able to use options_for_select(). This has been deprecated and is not available in Pylons 0.9.7. Instead, you just pass in the list of tuples directly via options. You’ll also notice that the order of items in the tuple is reversed. options_for_select() expects arguments in the form (label, value), but this isn’t how most Python objects are generated.
The following shows select() in action:
>>> select("currency", "$", [["$", "Dollar"], ["DKK", "Kroner"]])
literal(u'<select name="currency">\n<option selected="selected" value="$">Dollar</option>\n<option value="DKK">Kroner</option>\n</select>')
>>> select("cc", "MasterCard", [ "VISA", "MasterCard" ], id="cc", class_="blue")
literal(u'<select class="blue" id="cc" name="cc">\n<option value="VISA">VISA</option>\n<option selected="selected" value="MasterCard">MasterCard</option>\n</select>')
>>> select("cc", ["VISA", "Discover"], [ "VISA", "MasterCard", "Discover" ])
literal(u'<select name="cc">\n<option selected="selected" value="VISA">VISA</option>\n<option value="MasterCard">MasterCard</option>\n<option selected="selected" value="Discover">Discover</option>\n</select>')
Uploading Files
File upload fields are created by using the file input field type. The file() helper provides a shortcut for creating these form fields:
${h.file('myfile')}
To use the file field, you need to import it into the project’s lib/helpers.py file:
from webhelpers.html.tags import file
The HTML form must have its enctype attribute set to multipart/form-data to enable the browser to upload the file. The form() helper’s multipart keyword argument provides a shortcut for setting the appropriate enctype value. You don’t need to explicitly mark the form to use a POST because the helper automatically sets the method attribute to post when you specify the enctype for a file upload.
Let’s add a new controller to the form named upload:
$ paster controller upload
Change the index() action so it looks like this:
def index(self):
    return render('/uploadform.html')
Then add this new template to the templates directory as uploadform.html:
<%inherit file="/base.html" />
<h1>Upload a File</h1>


${h.form(h.url_for(controller='upload', action='upload'), multipart=True)}
Upload file:      ${h.file('myfile')} <br />
Description:      ${h.text('description')} <br />
                  ${h.submit('submit', 'Submit')}
${h.end_form()}
If you visit http://localhost:5000/upload/index, you should see the form.
Now let’s think about how to handle the upload. When a file upload has succeeded, the request.POST (or request.params) MultiDict will contain a cgi.FieldStorage object as the value of the field.
FieldStorage objects have three important attributes for file uploads:
- filename
- This is the name of the file uploaded as it appeared on the uploader’s filesystem.
- file
This is a Python tempfile object from which the file can be read. For example:
data = request.params['myfile'].file.read()
- value
- This is the content of the uploaded file, eagerly read directly from the file object.
The easiest way to gain access to the file’s data is via the value attribute, which returns the entire contents of the file:
def upload(self):
    myfile = request.POST['myfile']
    return "Successfully uploaded: %s, size: %i, description: %s" % (
        myfile.filename,
        len(myfile.value),
        request.POST['description']
    )
However, reading the entire contents of the file into memory is undesirable, especially for large file uploads. A common means of handling file uploads is to store the file somewhere on the filesystem. The FieldStorage instance already reads the file onto the filesystem; however, it’s to a nonpermanent location, via a Python tempfile object.
Here’s an example that uses shutil.copyfileobj() to perform an efficient copy of the temp file’s data to a permanent location specified by the permanent_store variable in the config file:
def upload(self):
    myfile = request.POST['myfile']
    permanent_file = open(
        os.path.join(
            config['app_conf']['permanent_store'],
            myfile.filename.replace(os.sep, '_')
        ),
        'wb'
    )
    shutil.copyfileobj(myfile.file, permanent_file)
    myfile.file.close()
    permanent_file.close()

    return 'Successfully uploaded: %s, description: %s' % (
        myfile.filename,
        request.POST['description']
    )
For this example to work, you’ll need to add some imports at the top of the file:
import os
from pylons import config
import shutil
You’ll also need to edit the development.ini config file and add this to the end of the [app:main] section:
permanent_store = %(here)s/data/uploads
You’ll remember from the discussion of config files in Chapter 3 that %(here)s is replaced with the location of the config file, so this example would upload files to the project’s data directory used as a cache for templates and sessions. You’ll need to create the uploads directory within the data directory because it won’t exist yet.
Caution
This basic example allows any file uploaded to overwrite any file in the permanent_store directory to which your web application has permissions.
Also note the use of myfile.filename.replace(os.sep, '_') to ensure that the file name doesn’t start with a / character. This is a simple security measure to help prevent specially crafted file names resulting in other files on your system being overwritten. You should always be suspicious of all data coming from a user’s web browser and take appropriate steps to try to ensure that the data is safe.
Now that you can handle files being uploaded to the server, you might also want to provide a way for your users to download those files again.
First you’ll need to import the mimetypes module to guess the content type of the file, so you should add the following import to the top of your controller:
from mimetypes import guess_type
You can then provide the download with an action like this:
def download(self):
    requested_filename = request.params['requested_filename']
    filename = os.path.join(
        config['app_conf']['permanent_store'],
        requested_filename.replace(os.sep, '_')
    )
    if not os.path.exists(filename):
        return 'No such file'
    permanent_file = open(filename, 'rb')
    data = permanent_file.read()
    permanent_file.close()
    response.content_type = guess_type(filename)[0] or 'text/plain'
    return data
You can test this by uploading a text file called somefile and then visiting the URL http://localhost:5000/upload/download?requested_filename=somefile. The example so far will correctly send the file to the browser, but the browser will try to display it if it is a type it recognizes such as a JPEG or a PNG file. If you want to force the browser to download the file as an attachment, you can add another HTTP header to the response like this just before you return the data:
response.headers['Content-Disposition'] = 'attachment; filename="%s"'%(
     requested_filename
 )
This time the browser will treat the file as an attachment and prompt the user to ask how the file should be handled (see Figure 6-4).
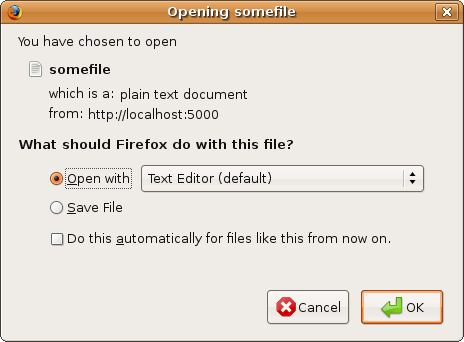
Figure 6-4. The Firefox attachment download dialog box
Notice how in this example because the name given for the file name in the Content-Disposition HTTP header was somefile, the browser automatically tried to name the file somefile on the user’s computer.
Caution
Internet Explorer 6 has trouble downloading certain files as attachments over sites using a secure connection (see http://support.microsoft.com/default.aspx?scid=kb;en-us;812935).
If you are writing a secure application that will be accessed by users with Internet Explorer, you should also add the following headers to the response to correct the problem:
response.headers['Content-Length'] = len(data)
response.headers['Pragma'] =  'public'
response.headers['Cache-Control'] = 'max-age=0'
Note that this an issue with Internet Explorer 6, not with Pylons!
Handling Forms Manually
In the initial example in this chapter, I described how to create a simple form that enables a user to enter their e-mail address and to redisplay the value that was entered in a Pylons application. In most situations, it is important to be able to validate the information the user has entered. If you were asking for an e-mail address with an intention to use it to contact someone, it is important the e-mail address is a real address, so you would want to run some basic checks to ensure the e-mail wasn’t obviously entered incorrectly. For example, the e-mail address should contain two strings separated by an @ character, and the domain name portion should contain a . character that should be followed by at least two characters representing the top-level domain. There are even more checks you could make, including ensuring the domain portion of the e-mail was a real domain name, but this probably isn’t necessary for most situations.
If a user did enter an invalid e-mail, you would need to redisplay the form together with the e-mail address entered and an error message explaining what was wrong so that the user could correct their mistake. Let’s create a controller to demonstrate this process manually. Later in the chapter, you’ll learn how the Pylons tools make this process a lot simpler.
Let’s update the formtest controller from earlier in the chapter to demonstrate this. Update the submit() action to look like this, and remove the result() action:
def submit(self):
    c.email_msg = ''
    c.email_value = ''
    email = request.params.get('email')
    if not email:
        c.email_msg = "Please enter a value"
    elif '@' not in email:
        c.email_msg = "An email address must contain at least one '@' character."
    else:
        domain = email.split('@')[1]
        if '.' not in domain:
            c.email_msg = "An email address domain must contain "
            c.email_msg += "at least one '.' character."
        if not domain.split('.')[-1]:
            c.email_msg = "Please specify a domain type after the '.' character"
    if c.email_msg:
        c.email_value = email
        return render('/simpleform.html')
    return 'Your email is: %s' % request.params['email']
Update the simpleform.html template to look like this:
<%inherit file="/base.html" />
<h1>Enter Your E-mail Address</h1>

${h.form(h.url_for(controller='formtest', action='submit'), method='get')}
% if c.email_msg:
    <span class="error-message">${c.email_msg}</span><br />
% endif
E-mail Address: ${h.text('email', value=c.email_value)}
                ${h.submit('submit', 'Submit')}
${h.end_form()}
You’ve used the Pylons’ helpers to generate the fields in this example; remember, you are free to use the helpers or to code your own HTML.
If you visit http://localhost:5000/formtest/form, you will see that it achieves the desired result. If a user enters an invalid e-mail address, it will result in the form being redisplayed to show the error with the incorrect value still present in the text field ready to be corrected.
To make the error show up better, it would be sensible to add some Cascading Style Sheets (CSS) so that the error appears in red. The <head> of the page is defined in the base.html template, so you better add the CSS there.
Edit base.html so that you include the following line in the <head> section:
<link rel="stylesheet" type="text/css"
    href="${h.url_for('/style/style.css')}" />
Then create a style directory in your project’s public directory, and create a file called style.css with the following content:
span.error-message {
    font-weight: bold;
    color: #f00;
}
You should find that all the error messages now appear in red, which will make the error much more obvious to your users (see Figure 6-5).
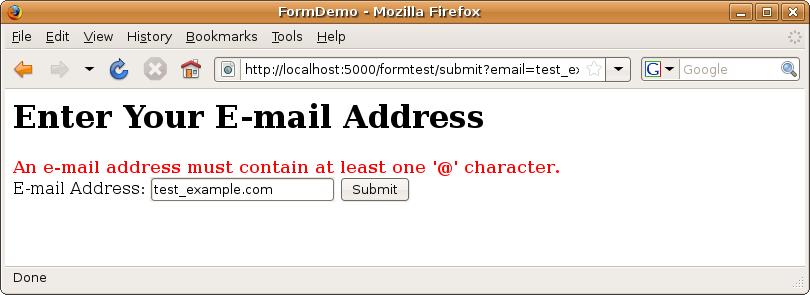
Figure 6-5. The error message highlighted in red
Although the approach you’ve used here to manually validate the form works perfectly well, it would quickly become very complex if you were to also write code to handle many other types of fields in the same way. Luckily, Pylons comes with tools to make the processes you have just used much simpler.
Introducing FormEncode
The recommended tool for validating forms in Pylons is FormEncode. FormEncode has two parts:
- A set of validators used together to create schemas, which convert form data back and forth between Python objects and their corresponding form values
- A tool called HTML Fill that takes an HTML form and parses it for form fields, filling in values and error messages as it goes from Python objects
Pylons provides a @validate decorator, which can make the process of validating form data and redisplaying the form if necessary very easy, but in order to really understand what is going on during the validation process, I’ll first explain the process in full.
For each form you create, you also create a validation schema. Here is the validation schema for the form you’ve been using so far. The example also includes a date field so I can later demonstrate how you can use schemas to convert data from one type to another as well as just validate input.
import formencode

class EmailForm(formencode.Schema):
    allow_extra_fields = True
    filter_extra_fields = True
    email = formencode.validators.Email(not_empty=True)
    date = formencode.validators.DateConverter(not_empty=True)
Although the form now has three fields—an e-mail text field, a date validator, and a submit button—you are interested only in validating the e-mail address and the date. If extra fields are submitted, FormEncode’s default behavior is to consider the form invalid, so you specify allow_extra_fields = True so that the value of the submit button is not validated. Since you don’t want to use the value of the submit button, you also specify filter_extra_fields = True so that the value is ignored completely.
The third line specifies that the e-mail field should be validated with an Email() validator. In creating the validator, you also specify not_empty=True so that the e-mail field will require input. The final line specifies your date field and also that this particular date field should not be empty either.
Table 6-1 outlines the options that can be used in a schema in addition to the validators themselves.
| Attribute Name | Default Value | Description |
|---|---|---|
| pre_validators | [] | These validators will be applied before the schema. |
| chained_validators | [] | These validators will be applied after the schema. |
| allow_extra_fields | False | If True, then it is not an error when keys that aren’t associated with a validator are present. |
| filter_extra_fields | False | If True, then keys that aren’t associated with a validator are removed. |
| if_key_missing | NoDefault | If this is given, then any keys that aren’t available but are expected will be replaced with this value (and then validated). This does not override a present .if_missing attribute on validators. NoDefault is a special FormEncode class to mean that no default values have been specified and therefore missing keys shouldn’t take a default value. |
| ignore_key_missing | False | If True, then missing keys will be missing in the result, if the validator doesn’t have .if_missing on it already. |
Table 6-1. Additional Options That Can Be Used in a FormEncode Schema
It is usually best to keep form schemas together so that you have a single place you can go to update them. It’s also convenient for inheritance since you can make new form schemas that build on existing ones. If you put your forms in a model/form.py file, you can easily use them throughout your controllers. However, if you are creating a schema that is going to be used in only one controller, it is often more convenient to keep the schema with the controller. This is what you’ll do here. Add the EmailForm schema to the top of the controller.
Now that you have added the schema, you need to be able to use it in your controller to validate the submitted form data that comes in via request.params and to convert the validated values from the format in which they are submitted to Python objects that can be used in the controller.
This is very straightforward because each Schema base class (and therefore the EmailForm class) has a to_python() method to handle the validation and conversion. If any of the validators fail to be able to convert the data, they raise a special exception type called a formencode.Invalid exception, which contains information about why the validation and conversion failed. Let’s see it in practice. Be sure you’ve added the EmailForm schema and import formencode line to the top of the controller file, and then update the submit() action to look like this:
def submit(self):
    schema = EmailForm()
    try:
        form_result = schema.to_python(dict(request.params))
    except formencode.Invalid, error:
        response.content_type = 'text/plain'
        return 'Invalid: '+unicode(error)
    else:
        return 'Your email is: %s'%form_result.get('email')
You’ll also need to update the simpleform.html template to add the date field:
<%inherit file="/base.html" />
<h1>Enter Your E-mail Address</h1>

${h.form(h.url_for(controller='formtest', action='submit'), method='get')}
<p>E-mail Address: ${h.text('email')}</p>
<p>Date:           ${h.text('date')}</p>
<p>                ${h.submit('submit', 'Submit')}</p>
${h.end_form()}
This new template is much simpler, but you’ll notice that it doesn’t contain any logic for setting the value of the e-mail field or displaying an error message. This will be handled separately using HTML Fill, which I’ll discuss later in the chapter.
If the values entered in the form are valid, the schema’s to_python() method returns a dictionary of the validated and coerced data, in this case assigned to form_result. This means you can guarantee that the form_result dictionary contains values that are valid and correct Python objects for the data types desired.
In this case, the e-mail address is a string, so request.params['email'] happens to be the same as form_result['email'], but for the date field, request.params['date'] is a string in the form "mm/dd/yyyy", whereas form_result['date'] is a Python datetime.date object representing the date the user entered. For even more complex data types, this ability of FormEncode to coerce data becomes very valuable.
Try entering some dates and e-mail addresses, both valid and invalid, and see the error messages FormEncode produces. As an example, if you entered the e-mail address james.example.com and the date 01/40/2008, you would get the following errors:
Invalid: date: That month only has 31 days
email: An email address must contain a single @
Now try entering some valid data such as james@example.com and 01/15/2006 and change the end of the submit() action to look like this:
...
else:
    raise Exception(form_result)
    return 'Your email is: %s'%form_result.get('email')
From the exception that occurs, you can see that form_result actually contains the following:
{'date': datetime.date(2006, 1, 15), 'email': u'james@example.com'}
As you can see, FormEncode has done more than simply validate the data; it has also converted it to the appropriate Python type so that you can easily work with it. The DateConverter validator has converted the text entered in the form into a Python date object, and the Email validator has returned a Unicode string. This is useful if you want to convert Python objects from your database to display in a table as part of your web application, for example. It is also used by HTML Fill to automatically repopulate form data if your form contains errors.
Here are some of the most frequently used FormEncode validators. For the full list, see the Available Validators documentation on the FormEncode web site:
- MaxLength
- The submitted value is invalid if it is longer than the maxLength argument. It uses len(), so it can work for strings, lists, or anything with length.
- MinLength
- The submitted value is invalid if it is shorter than the minLength argument. It uses len(), so it can work for strings, lists, or anything with length.
- Regex
- The submitted value is invalid if it doesn’t match the regular expression regex. This is useful for matching phone numbers or postal codes, for example.
- PlainText
- This validator ensures that the field contains only letters, numbers, underscores, and hyphens. It subclasses Regex.
- DateConverter
- This validates and converts a date represented as a string, such as mm/yy, dd/mm/yy, dd-mm-yy, and so on. By using the month_style argument you can support mm/dd/yyyy or dd/mm/yyyy. Only these two general styles are supported.
- TimeConverter
- This converts times in the format HH:MM:SSampm to (h, m, s). Seconds are optional.
- StringBool
- This converts a string such as "true" or "0" to a boolean.
- Int
- This converts a value to an integer.
- Number
- This converts a value to a float or integer. It tries to convert it to an integer if no information is lost.
- String
- This converts things to string but treats empty things as the empty string.
- UnicodeString
- This converts things to Unicode strings. This is a specialization of the String class.
- URL
- This validates a URL, either http:// or https://. If check_exists is True, then you’ll actually make a request for the page.
- This validates an e-mail address with the facility to check that the domain entered actually exists.
- OneOf
- This tests that the value is one of the members of a given list. This is particularly useful when validating an option from a select field because you can use it to check that the value submitted was one of the original values.
- FieldsMatch
- This tests that the given fields match, that is, are identical. It is useful for password+confirmation fields. Pass the list of field names in as field_names.
- ForEach
- Use this to apply a validator/converter to each item in a list.
- All
- This class is like an and operator for validators. All validators must work, and the results are passed in turn through all validators for conversion.
- Any
- This class is like an or operator for validators. The first validator/converter that validates the value will be used.
It can sometimes be difficult to work out the arguments that each validator will accept. The best way to find out is to look at the example usage for each type of validator on the FormEncode site. In addition to these arguments, validators also accept common arguments to configure their error messages and behavior. You’ll learn about these next.
Configuring Validators
Each of the validators will have a number of messages as well as a number of configuration options. Here are some examples of the sorts of messages available; these are for the ConfirmType validator:
- badType
- "The input must be a string (not a %(type)s: %(value)r)"
- empty
- "Please enter a value"
- inSubclass
- "%(object)r is not a subclass of one of the types %(subclassList)s"
- inType
- "%(object)r must be one of the types %(typeList)s"
- noneType
- "The input must be a string (not None)"
- subclass
- "%(object)r is not a subclass of %(subclass)s"
- type
- "%(object)r must be of the type %(type)s"
To override the default value for an error message, you pass a messages argument to the validator’s constuctor. For example:
name = String(messages={'empty':'Please enter a name'})
In each of these examples, constructs such as %(object)r and %(type)s are standard Python string-formatting terms. They are replaced by a string representation of the value to which they are referring. Terms ending in s result in the object being converted to a string with str(), and terms ending in r result in the objects being converted to a string with the repr() function that displays a Python representation of the value. You can use these same terms in your own custom messages if you like.
You don’t need to specify messages for every error; FormEncode will use its defaults for any you don’t specify. Messages often take arguments, such as the number of characters, the invalid portion of the field, and so on. These are always substituted as a dictionary (by name). So, you will use placeholders like %(key)s for each substitution. This way you can reorder or even ignore placeholders in your new message.
Later you’ll see how to create your own validator. When you are creating a validator, for maximum flexibility you should use the message function:
messages = {
    'key': 'my message (with a %(substitution)s)',
    }

def validate_python(self, value, state):
    raise Invalid(self.message('key', substitution='apples'),
                  value, state)
Most validators support the following options (including your own validators, if you subclass from FancyValidator):
- if_empty
- If set, then this value will be returned if the input evaluates to False (an empty list, empty string, None, and so on), but not a 0 or False objects. This applies only to .to_python().
- not_empty
- If True, then if an empty value is given, this raises an error (both with .to_python() and also .from_python() if .validate_python is True).
- strip
- If True and the input is a string, strip it (occurs before empty tests).
- if_invalid
- If set, then this validator will raise Invalid during .to_python(); instead, return this value.
- if_invalid_python
- If set, when the Python value (converted with .from_python()) is invalid, this value will be returned.
- accept_python
- If True (the default), then .validate_python() and .validate_other() will not be called when .from_python() is used.
The values of the configuration options are stored as class attributes. As an example, look at the DateConverter you used earlier. It is documented at http://formencode.org/class-formencode.validators.DateConverter.html, where you can see that the class has a number of attributes including month_style, which defaults to mm/dd/yyyy. There are two ways to set these attributes. The first is to pass the name of the attribute as an argument to the validator’s constructor when you create it. You’ve already seen an example of this technique when you passed not_empty=True to the DateConverter and EmailValidator validators in your schema.
The other way to configure a validator is by using inheritance. You can create a new validator derived from the old one but with different default values for the attributes. As an example, here is a UKDateConverter, which uses the U.K. format for the date by default:
class UKDateConverter(DateConverter):
    month_style = 'dd/mm/yyyy'
You could then update your schema to look like this:
class EmailForm(formencode.Schema):
    allow_extra_fields = True
    filter_extra_fields = True
    email = formencode.validators.Email(not_empty=True)
    date = UKDateConverter(not_empty=True)
You’ll learn more about creating your own validators later in this chapter.
Using HTML Fill
Now that you have learned how to use FormEncode to validate and coerce data, you will still need to display error messages along with a repopulated form should the user have entered any invalid data.
This is from the HTML Fill documentation:
htmlfill is a library to fill out forms, both with default values and error messages. It’s like a template library, but more limited, and it can be used with the output from other templates. It has no prerequesites and can be used without any other parts of FormEncode.
The basic usage looks something like this:
>>> from formencode import htmlfill
>>> form = '<input type="text" name="fname">'
>>> defaults = {'fname': 'Joe'}
>>> htmlfill.render(form, defaults)
'<input type="text" name="fname" value="Joe">'
The parser looks for HTML input elements (including select and textarea) and fills in the defaults. HTML Fill is therefore very useful in processing forms because you can return the form to the user with the values they entered, in addition to errors.
Let’s update the controller to use HTML Fill. Change the submit() action to look like this:
def submit(self):
    schema = EmailForm()
    try:
        c.form_result = schema.to_python(dict(request.params))
    except formencode.Invalid, error:
        c.form_result = error.value
        c.form_errors = error.error_dict or {}
        html = render('/simpleform.html')
        return htmlfill.render(
            html,
            defaults=c.form_result,
            errors=c.form_errors
        )
    else:
        return 'Your email is: %s and the date selected was %r.' % (
            c.form_result['email'],
            c.form_result['date'],
        )
You’ll also need to import HTML Fill. Add this import to the top of the controller:
from formencode import htmlfill
In this example, when an error occurs, you use Pylons’ render() function to render the HTML of the original form as it was before the user submitted it. You then pass the HTML, as well as the form result values and the error messages dictionary, into HTML Fill’s render() method. HTML Fill then parses the HTML, adding any error messages and field values for you automatically. The filled HTML is then returned so that the user can correct the errors as before.
Notice that you don’t need the template code for the error messages and that none of the fields have values specified directly. HTML Fill populates the fields with the correct values and inserts any error messages automatically.
Tip
Being able to use plain HTML in this manner is actually very useful because it means any designers working on your project are able to use visual tools such as Dreamweaver (or the open source Nvu program based on Mozilla project code) and HTML Fill will still work perfectly, whereas these tools are not designed to visually display fields generated in templates with the helper functions. The decision as to whether you should use the field helpers or code HTML fields directly will depend largely on whether you want to use such tools.
If you run the example, you will see that the result is very similar to what was generated when you handled the form manually earlier in the chapter. The HTML generated for the error messages is slightly different, though. It includes some comments added by HTML Fill.
This is the generated HTML:
<html>
<head>
<title>FormDemo</title>
<link rel="stylesheet" type="text/css"
    href="/style/style.css" />
</head>
<body>

<h1>Enter Your E-mail Address</h1>

<form action="/formtest/submit" method="get">
<p>E-mail Address: <!-- for: email -->
<span class="error-message">An email address must contain a single @</span><br />
<input name="email" type="text" class="error" value="test_example.com" /></p>

<p>Date:           <!-- for: date -->
<span class="error-message">That month only has 31 days</span><br />
<input name="date" type="text" class="error" value="1/40/2008" /></p>
<p>                <input name="submit" type="submit" value="Submit" /></p>
</form>
</form>


</body>
</html>
Error Message Formatting
The error message formatting might not be quite what you were after, so HTML Fill defines two special tags that can be used to customize how the error messages are displayed:
- <form:error name="field_name" format="formatter">:
- This tag is eliminated completely if there is no error for the named field. Otherwise, the error is passed through the given formatter (default() if no format attribute is given).
- <form:iferror name="field_name">...</form:iferror>:
- If the named field doesn’t have an error, everything between the tags will be eliminated. Use name="not field_name" to invert the behavior (in other words, include text only if there are no errors for the field).
Formatters are functions that take the error text as a single argument and return a string that is inserted into the template. Formatters are specified as arguments to the htmlfill.render() function, which I will describe next. The default formatter returns the following:
<span class="error-message">(message)</span><br>
where (message) is replaced with the error message concerned. Most of the time it is best to use a formatter because the second form displays the static HTML you’ve specified, not the actual error message generated.
If any errors are generated for fields that don’t exist, they are added at the top of the form.
Render Arguments
HTML Fill’s render() function has the following arguments that you can use to customize how the form is rendered:
def render(form, defaults=None, errors=None, use_all_keys=False,
       error_formatters=None, add_attributes=None,
       auto_insert_errors=True, auto_error_formatter=None,
       text_as_default=False, listener=None)
It is important to note that HTML Fill’s render() function has nothing to do with the render() function you’ve been using to render templates; it is just unfortunate that both have the same name.
The example so far has used the form, defaults and errors arguments, but other options can be useful too:
- use_all_keys
- If this is True, if there are any extra fields from defaults or errors that couldn’t be used in the form, it will be an error.
- error_formatters
- This is a dictionary of formatter names to one-argument functions that format an error into HTML. Some default formatters are provided if you don’t provide this.
- add_attributes
- This is a dictionary of field names to a dictionary of attribute name/values. If the name starts with +, then the value will be appended to any existing attribute (for example, {'+class': ' important'}).
- auto_insert_errors
- If this is True (the default), then any errors for which <form:error> tags can’t be found will be put just above the associated input field, or at the top of the form if no field can be found.
- auto_error_formatter
- This is used to create the HTML that goes above the fields. By default, it wraps the error message in a span and adds a <br>.
- text_as_default
- If this is True (the default is False), then <input type=unknown> will be treated as text inputs.
- listener
- This can be an object that watches fields pass; the only one currently is in formencode.htmlfill_schemabuilder.SchemaBuilder.
Doing Validation the Quick Way
Now that you’ve seen in detail how to use FormEncode and HTML Fill, you’ll be pleased to know that Pylons provides an even simpler way of using the same functionality that is suitable for the majority of use cases you are likely to encounter.
You can use it like this:
def form(self):
    return render('/simpleform.html')

@validate(schema=EmailForm(), form='form', post_only=False, on_get=True)
def submit(self):
    return 'Your email is: %s and the date selected was %r.' % (
        self.form_result['email'],
        self.form_result['date'],
    )
You’ll need to import the @validate decorator at the top of the controller:
from pylons.decorators import validate
What this says is that if the data submitted to the submit() action contains any errors, then the request should be rerun as a GET request to the form() action. The result of calling the form() action is then passed through HTML Fill to render the errors and repopulate the form with the values that were submitted.
Note
Python 2.3 doesn’t support decorators, so rather than using the @validate() syntax, you need to put email = validate(schema=EmailForm(), form='form', post_only=False, on_get=True)(email) after the e-mail function’s declaration.
By default, if you don’t specify post_only=False and on_get=True to the @validate decorator, validation would occur only on POST requests, so you would need to alter your form definition so that the method is a POST:
<% h.form(h.url_for(action='submit'), method='post') %>
Caution
If you do this, calling an action wrapped by @validate using a GET request will bypass the validation and call the action anyway. You need to make sure this doesn’t pose a security risk in your application. You could prevent this by testing whether a GET or a POST is being used in the body of the action. The request method can be determined using request.method.
You can customize the way HTML Fill is called by passing any of the arguments accepted by htmlfill.render() as keyword arguments to validate(). For example, to specify a custom error formatter, you can do this:
from formencode import htmlfill

def custom_formatter(error):
    return '<span class="custom-message">%s</span><br />\n' % (
        htmlfill.html_quote(error)
    )
Update the submit() action to look like this:
@validate(schema=EmailForm(), form='form', post_only=False, on_get=True,
    auto_error_formatter=custom_formatter)
def submit(self):
    return 'Your email is: %s and the date selected was %r.' % (
        self.form_result['email'],
        self.form_result['date'],
    )
With this in place, the error messages will be wrapped in <span class="custom-message"> tags. If you run the example, you will notice that the error messages are no longer highlighted in red because there is no style set up for the new error class.
You can pass other options to the HTML Fill render() function in the same way via the @validate decorator.
The @validate decorator is documented at http://docs.pylonshq.com/modules/decorators#module-pylons.decorators.
Using Custom Validators
FormEncode comes with a useful set of validators, but you can also easily create your own. One common reason for wanting to do this is if you are populating a select field with values from a database and you want to ensure the value submitted is one of the values in the database.
For this example, imagine you have a function called get_option_values() that interacts with a database every time it is called and returns a list of valid integers.
Here’s a potential implementation:
class ValidOption(formencode.validators.FancyValidator):

    def validate_python(self, value, state):
        valid_values = get_option_values()
        if value not in valid_values:
            raise formencode.Invalid("Invalid value", value, state)
When the validator is used in a schema and checked, an error message will be displayed if the value submitted isn’t one of the options returned by get_option_values().
You might use it like this:
class EmailForm(formencode.Schema):
    allow_extra_fields = True
    filter_extra_fields = True
    email = formencode.validators.Email(not_empty=True)
    date = formencode.validators.DateConverter(not_empty=True)
    option = ValidOption()
Let’s have a look at the implementation in more detail. Notice that the validate_python() method also takes a state argument. It’s used for very little in the validation system but provides a mechanism for passing information from Pylons to any custom validators you write. The c global is used in Pylons for storing per-request state information, so it makes sense to also use it as the state argument to your validators, although you are free to use other objects if you prefer.
As an example, let’s imagine that get_option_values() relied on a database connection that was set up on each request. You couldn’t pass the connection as an argument to ValidOption because the connection wouldn’t exist at the point Python created the schema. The connection exists only during the request, so you would attach it to the c global during the request and pass the c global as the state argument when instantiating the schema. Here’s how the start of the submit() action might look from the full FormEncode and HTML Fill example earlier:
def submit(self):
    # Imagine we have a connection object now:
    c.connection = connection
    schema = EmailForm(state=c)
    ... same as before
You could now update the example like this:
class ValidOption(formencode.validators.FancyValidator):

    def validate_python(self, value, c):
        valid_values = get_option_values(c.connection)
        if value not in valid_values:
            raise formencode.Invalid("Invalid value", value, c)
In this way, the validator can use request-specific information even though it is defined before the request starts.
The previous implementation uses the validate_python() method, which simply raises an exception if it needs to do so. This is useful in this example because the conversion needs to be done by the validator when converting to and from Python. This won’t be the case for all the validators you create, though. The _to_python() and _from_python() methods are provided for you to implement any conversion code to convert to or from Python, respectively.
The validate_python() method is called after _to_python() so that the value argument will be a normal Python object by the time it comes to being validated. validate_python() is called before _from_python(). Both _to_python() and _from_python() take the same arguments as validate_python().
You’ll remember from earlier in the chapter that validators can be customized when you instantiate them in a schema. At the moment, the validator you’ve created always displays the message Invalid value. Let’s update the validator to allow it to be customized:
class ValidOption(formencode.validators.FancyValidator):

    messages = {
        'invalid': 'Invalid value',
    }

    def validate_python(self, value, c):
        valid_values = get_option_values(c.connection)
        if value not in valid_values:
            raise formencode.Invalid(
                self.message("invalid", c),
                value,
                c
            )
You can also include values in the message itself like this:
class ValidOption(formencode.validators.FancyValidator):

    messages = {
        'invalid': 'Invalid value %(invalid)s',
    }

    def validate_python(self, value, c):
        valid_values = get_option_values(c.connection)
        if value not in valid_values:
            raise formencode.Invalid(
                self.message("invalid", c, invalid=value),
                value,
                c
            )
The message string specified gets interpolated with a dictionary made from the keyword arguments you pass to the self.message() function. This system is designed to make the messages easy to format for different environments or replaceable for different languages.
You’ll also notice that you use a special exception class, formencode.Invalid, to raise an error. This is the same exception class you catch in the controller action and use to obtain the values to pass to htmlfill.render(). Besides the string error message, Invalid exceptions have a few other instance variables:
- value
- This is the input to the validator that failed.
- state
- This is the associated state.
- msg
- This is the error message (str(error) returns this).
- error_list
- If the exception happened in a ForEach (list) validator, then this will contain a list of Invalid exceptions. Each item from the list will have an entry, either None for no error or an exception.
- error_dict
- If the exception happened in a Schema (dictionary) validator, then this will contain Invalid exceptions for each failing field.
- .unpack_errors()
- This method returns a set of lists and dictionaries containing strings for each error. It’s an unpacking of error_list, error_dict, and msg. If you get an Invalid exception from a Schema, you probably want to call this method on the exception object.
If you are interested in writing your own validators, it is useful to see the source code for the FancyValidator class. It is in the formencode.api module and explains all the options and methods validators have. There are other types of validators too such as compound validators and chained validators. Generally speaking, the best way to implement your own validator is to look at the source code of an existing validator that behaves in a similar manner and implement your own validator in the same way.
Solving the Repeating Fields Problem
In real-world examples, you rarely just need a form that can be populated from a flat dictionary structure. Forms that contain subforms or repeating sets of fields are actually very common.
Let’s imagine a situation where you are writing a form to allow a researcher to add information about a research project they are conducting. They might need to provide the following information:
- The title of the study
- When it is going to start and end
- The contact details of the people who are participating
Contact details consist of the following information:
- Title
- First name
- Surname
- Role in the project
Let’s also imagine that a research project requires at least one person to be added and also that there can be only one person with the role of chief investigator.
You can easily provide a form to enter the study title, start date, and end date, but providing a form to allow an unknown number of people’s contact details to be entered is slightly trickier. You can take one of two approaches:
- Design the form in a wizard format. The user enters the title, start date, and end date on the first screen and clicks Submit. The data is saved, and the second screen is displayed, allowing the user to add the contact details of the first person. Once they have submitted the form, they are asked whether they want to add another person. This continues until they have added all the necessary data.
- Display a single form containing the title, start date, and end date as before but with a button to allow the user to add fields to add a person. When the user clicks the Add New Person button, a set of fields to enter the first person are shown. The user can submit the form or click the Add New Person button again to add another set of fields. Finally, once they have completed the whole form containing the study and person data, they click Save, and the data is validated and saved in one go.
The advantage of the first approach is that at any one time you are dealing with only one set of fields that can be submitted as simple name/value pairs, so the data structure is very straightforward. The disadvantage is that at each step in the wizard you need to store the data that has already been submitted, and this has its own problems. Imagine, for example, you save the study information in the first step but the user changes their mind and never completes the second step of adding a person. One of the requirements was that studies should have at least one person associated with them, but now you have saved a study that doesn’t have any people. Say, instead, that the user does add a person and gives them a role of chief investigator. Now let’s imagine they add another person and give them a role of chief investigator too. You can’t have more than one chief investigator, so the validation code will display an error explaining the problem. Imagine, though, that the user really does want the second person to be the chief investigator and made a mistake in giving the first person the chief investigator role. The user has no choice but to start the form again.
Obviously, all the problems with the wizard approach can be solved. You can store the data in a temporary location or a session store and save it properly only at the end of the wizard, or you can provide Back buttons so the user can go back through the wizard and make changes, but it can be a surprising amount of work to program the logic and validation code for this sort of workflow.
The major advantage of the second approach is that all the required data is stored client-side throughout the submission and validation cycles, which means your Pylons controller needs to store the data only once, after all the input has been validated. This can greatly reduce the complexity of your controller logic. FormEncode provides the necessary tools to help you with this.
Creating the Form
The first thing you need to do is define the schema. Here’s what the main study schema might look like:
class Study(Schema)
    title = String(not_empty=True)
    start_date = DateConverter()
    end_date = DateConverter()
    people = ForEach(Person())
As you can see, the schema has title, start_date, and end_date fields, which use ordinary validators as you would expect, but there is also a people field that takes a ForEach() validator. The ForEach() validator takes a single argument, which is another validator or schema it should validate. In this case, you want it to validate people, so you’ve specified an instance of a Person schema. The Person schema looks like this:
class Person(Schema):
    title = String()
    firstname = String(not_empty=True)
    surname = String(not_empty=True)
    role = OneOf(['1', '2', '3'])
The role field will be a select drop-down that takes the values in Table 6-2.
| Name | Value |
|---|---|
| Chief investigator | 1 |
| Assistant | 2 |
| Student | 3 |
Table 6-2. Possible Values for Role
The OneOf validator checks that the value submitted for the role is one of the values specified.
Now turn your attention to the template defs to produce the fields. You’ll create a working example as you go through this chapter, so let’s create a project for it (accept the default values when prompted):
$ paster create --template=pylons FormExample
$ cd FormExample
$ paster controller study
Create two directories named base and derived in the templates directory, and add a base/index.html file that looks like this:
<html>
<head>
<title>FormsExample</title>
<style type="text/css">
span.error-message{
    font-weight: bold;
    color: #c00;
}
</style>
</head>
<body>
${next.body()}
</body>
</html>
Then create a new template called derived/form.html with the following content:
<%inherit file="/base/index.html" />

<%def name="study()">
    <fieldset><legend>Study</legend>

        <label for="title">Title</label><br />
        ${h.text(name="title", id="title")}<br />

        <label for="start_date">Start Date</label><br />
        ${h.text(name="start_date", id="startdate")}<br />

        <label for="end_date">End Date</label><br />
        ${h.text(name="end_date", id="enddate")}<br />
    </fieldset><br />
        % for id in range(c.number_of_people):
            ${person(id=id)}
        % endfor
</%def>

<%def name="person(id)">
    <fieldset><legend>Person</legend>

        <label for="person-${id}.title">Title</label><br />
        ${h.text(name="person-%s.title"%(id), id="person-%s.title"%(id))}<br />

        <label for="person-${id}.firstname">First Name</label><br />
        ${h.text(
            name="person-%s.firstname"%(id),
            id="person-%s.firstname"%(id
        ))}<br />

        <label for="person-${id}.surname">Surname</label><br />
        ${h.text(name="person-%s.surname"%(id), id="person-%s.surname"%(id))}<br />

        <label for="person-${id}.role">Role</label><br />
        ${h.select(
            "person-%s.role"%(id),
            [],
            [
                ['1', 'Chief Investigator'],
                ['2', 'Assistant'],
                ['3', 'Student'],
            ],
            id="person-%s.role"%(id),
        )}<br />

        ${h.submit(name="action", value="Remove %s"%(id))}

    </fieldset><br />
</%def>

<h1>Create a Study</h1>

${h.form(h.url_for(controller='study', action='process'))}
${study()}
${h.submit(name="action", value="Save")}
${h.submit(name="action", value="Add New Person")}
${h.end_form()}
Rendering this template would result in the study() def being called, and this in turn would call the person() def to create a set of fields for the number of people specified in c.number_of_people, which you will set in the controller in a minute.
Tip
The template you’ve created uses <fieldset> and <label> HTML tags to create the form rather than creating a layout with tables or other HTML structures. This is considered best practice because the for attributes of the <label> tags clearly associate the text of the label with the field itself so that people who use screen readers will still be able to fill in your form. Using this technique also makes your forms much easier to style using CSS.
The Study schema expects nested data structures, but HTML forms produce flat structures with keys (field names) and their associated values. To solve this problem, FormEncode provides a NestedVariables class in the nestedvariables module that provides a way of converting nested data structures to and from a flat set of field names. To do this, it uses keys with "." for nested dictionaries and "-int" for (ordered) lists. A structure like this:
{
    'people': [
        {'fname': "John", 'lname': "Doe"},
        {'fname': "Jane", 'lname': 'Brown'},
        "Tim Smith"
    ],
    'action': {
        None: "save",
        'option': "overwrite",
        'confirm': "yes"
    },
}
can therefore be mapped to form fields with the names and values in Table 6-3.
| Names | Value |
|---|---|
| people-0.fname | John |
| people-0.lname | Doe |
| people-1.fname | Jane |
| people-1.lname | Brown |
| people-2 | Tim Smith |
| action | save |
| action.option | overwrite |
| action.confirm | yes |
Table 6-3. Field Names Used in the Example and Their Corresponding Values
Notice how the value save is associated directly with action rather than action.None. This is so that if the dictionary contained a key "None" and a key None, they could both be handled correctly.
Returning to the example, notice how in the person def you just created the field names that make up each person follow this naming convention so that FormEncode can automatically convert the values submitted from the HTML form into the nested data structure the Study schema requires.
To make this conversion happen automatically, you need to add a NestedVariables prevalidator to the Study schema so it looks like this:
class Study(Schema):
    pre_validators = [NestedVariables()]
    title = String(not_empty=True)
    start_date = DateConverter()
    end_date = DateConverter()
    person = ForEach(Person())
Prevalidators are validators that are run on the values before the values are passed to each of the other validators for validation and conversion. Schemas also take a chained_validators attribute, which you’ll see later is for performing validation on the whole form after the prevalidators and individual field validators have been run.
The form also includes buttons for adding new people and removing ones the user added by mistake. These fields aren’t part of the schema and don’t need to be included in the validated and converted output, so you can also add the attributes allow_extra_fields=True and filter_extra_fields=True to the Study schema.
At this stage, you can start adding content including the finished schemas to the study controller you created earlier. At the top of the file after log is set up, add the following:
from formencode.schema import Schema
from formencode.validators import Invalid, FancyValidator
from formencode.validators import Int, DateConverter, String, OneOf
from formencode import variabledecode
from formencode import htmlfill
from formencode.foreach import ForEach
from formencode.api import NoDefault

class Person(Schema):
    title = String()
    firstname = String(not_empty=True)
    surname = String(not_empty=True)
    role = OneOf(['1', '2', '3'])

class Study(Schema):
    allow_extra_fields = True
    filter_extra_fields = True
    pre_validators = [variabledecode.NestedVariables()]
    title = String(not_empty=True)
    start_date = DateConverter()
    end_date = DateConverter()
    person = ForEach(Person())
One of the requirements was that a study should have at least one person. The ForEach validator you are using to validate people takes the same not_empty argument that validators such as String take, so you might think that adding not_empty=True to the validator constructor would be all you had to do. Unfortunately, this isn’t the case; the ForEach validator is set up to return the value [] if the field is missing, so FormEncode doesn’t notice the problem. There are two ways to fix this depending on what you want to achieve:
- Use not_empty=True, but always specify a hidden field such as <input type="hidden" name="person" value="" /> so that a value is always submitted and FormEncode is forced to validate the field. When the value "" is received, the not_empty=True argument means the standard empty message Please enter a value gets displayed and the user is aware of the problem. When people are added, the hidden field still gets submitted, but variabledecode overwrites the value with the decoded people values, so everything works as it should.
- Use if_missing=NoDefault to tell FormEncode not to return an empty list, [], if no people are submitted (which is the default behavior). Instead, because there is no default, the Study schema will display its missing message Missing value.
You can also customize the Missing value message using the second approach like this:
ForEach(
    Person(),
    if_missing=NoDefault,
    messages={'missing':'Please add a person'}
)
Another requirement is that there should be only one chief investigator. You can check this condition by creating a custom validator to check for the presence of the one chief investigator. You could implement this as a normal validator, but here you are going to implement it as a chained validator. Chained validators are slightly different from normal validators because they are checked only once all the individual fields have been validated. They are usually used when a validation rule depends on more than one field.
Ordinary validators are passed the raw unconverted value from the field they are validating. Chained validators are passed the validated and converted dictionary of data generated after all the other validators have been run.
Here’s what the validator looks like:
from formencode.validators import FancyValidator

class OneChiefInvestigator(FancyValidator):

    messages = {
        'too_many_cis':"Only one Chief Investigator is allowed, not %(number)s"
    }

    def validate_python(self, values, c):
       chief_investigators_found = 0
       for person in values['person']:
            if person['role'] == u'1':
                chief_investigators_found += 1
       if chief_investigators_found > 1:
            raise Invalid(
                self.message("too_many_cis", c, number=chief_investigators_found),
                values,
                c
            )
Add this validator to the schema like this:
class Study(Schema):
    ...
    chained_validators = [OneChiefInvestigator()]
The schema and templates are now in place, so turn your attention to the controller code that will tie everything together. The first thing to notice is that the user will expect very different behavior depending on the button that is clicked. There are buttons to do the following:
- Save the form
- Add a new set of person fields
- Remove a particular set of person fields
To rerender the form after any of these actions, you need to calculate the number of people so that the form is regenerated with the correct number of sets of person fields. Here’s a function to do that:
def number_of_people(values):
    people_count = 0
    for key in values.keys():
        if key.startswith('person-') and key.endswith('title'):
            people_count += 1
    return people_count
You’ll also need a function to render the template and fill it with the correct values and error messages:
def render_form(values=None, errors=None, number_of_people=0):
    c.number_of_people = number_of_people
    html = render('/derived/form.html')
    return htmlfill.render(html, defaults=values, errors=errors)
You can add these two functions beneath the schema definitions in your controller.
All the buttons have the same name, action, so the process() action you’ll create can determine which button has been pressed by looking at the value of the action URL parameter.
Here is the complete code including the schemas, validators, and controller:
import logging

from pylons import request, response, session, tmpl_context as c
from pylons.controllers.util import abort, redirect_to

from formexample.lib.base import BaseController, render
#from formexample import model

log = logging.getLogger(__name__)
from formencode.schema import Schema
from formencode.validators import Invalid, FancyValidator
from formencode.validators import Int, DateConverter, String, OneOf
from formencode import variabledecode
from formencode import htmlfill
from formencode.foreach import ForEach
from formencode.api import NoDefault

class OneChiefInvestigator(FancyValidator):

    messages = {
        'too_many_cis':"Only one Chief Investigator is allowed, not %(number)s"
    }

    def validate_python(self, values, c):
       chief_investigators_found = 0
       for person in values['person']:
            if person['role'] == u'1':
                chief_investigators_found += 1
       if chief_investigators_found > 1:
            raise Invalid(
                self.message("too_many_cis", c,  number=chief_investigators_found),
                values,
                c
            )

class Person(Schema):
    title = String()
    firstname = String(not_empty=True)
    surname = String(not_empty=True)
    role = OneOf(['1', '2', '3'])

class Study(Schema):
    allow_extra_fields = True
    filter_extra_fields = True
    pre_validators = [variabledecode.NestedVariables()]
    title = String(not_empty=True)
    start_date = DateConverter()
    end_date = DateConverter()
    person = ForEach(
        Person(),
        if_missing=NoDefault,
        messages={'missing':'Please add a person'}
    )
    chained_validators = [OneChiefInvestigator()]

def render_form(values=None, errors=None, number_of_people=0):
    c.number_of_people = number_of_people
    html = render('/derived/form.html')
    return htmlfill.render(html, defaults=values, errors=errors)

def number_of_people(values):
    people_count = 0
    for key in values.keys():
        if key.startswith('person-') and key.endswith('title'):
            people_count += 1
    return people_count

class StudyController(BaseController):

    def index(self):
        return render_form()

    def process(self):
        action = request.params.getone('action')
        values = dict(request.params)
        # Don't use the values field for repopulation
        del values['action']
        if action == 'Add New Person':
            # Render the form with one extra set of person fields
            return render_form(
                values=values,
                number_of_people = number_of_people(values) + 1
            )
        elif action.startswith('Remove'):
            # Get the ID of the set of person fields to remove
            id = int(action.split(' ')[-1])
            # Create a new set of values without those fields
            new_values = {}
            for k, v in values.items():
                if k.startswith('person-'):
                    name, field = k.split('.')
                    cur_id = int(name[len('person')+1:])
                    if cur_id<id:
                        new_values[k] = v
                    elif cur_id>id:
                        new_values['person-%s.%s'%(cur_id-1, field)] = v
                else:
                    new_values[k] = v
            # Render the form with the new values
            return render_form(
                values=new_values,
                number_of_people = number_of_people(new_values)
            )
        elif action=='Save':
            # Assume we are trying to save the form
            schema = Study()
            try:
                result = schema.to_python(dict(request.params), c)
            except Invalid, e:
                return render_form(
                    values=values,
                    errors=variabledecode.variable_encode(
                        e.unpack_errors() or {},
                        add_repetitions=False
                    ),
                    number_of_people=number_of_people(values)
                )
            else:
                # You would save the data here before redirecting
                # values will be a Python nested data structure
                # which shouldn't need any further conversion.

                # In this case we just display the result
                return str(result)
        else:
            raise Exception('Invalid action %s'%action)
Since this is a new project, you’ll need to add some helpers to the lib/helpers.py file before this example will work. Add these lines:
from webhelpers.html.tags import *
from routes import url_for
To test this example, start the development server with the paster serve --reload development.ini command, and visit http://localhost:5000/study/index.
If the Add New Person button is clicked, the form is rerendered with its submitted values and an extra set of person fields. No validation takes place at this stage, so the values redisplayed are the same as those entered.
If the user clicks one of the Remove Person buttons, the ID of the set of person fields to be removed is obtained from the button value, and that set of fields is manually removed from the dictionary of values that is used to repopulate the form when it is rendered.
If the action isn’t recognized, it is assumed the user clicked the Save button. The Study schema is used to validate and convert the data. The NestedVariables prevalidator converts the flat HTML form data into a nested data structure. Each of the fields in turn is then checked against its validator. In the case of person, this means each of the sets of person fields is itself validated against the Person schema. If there are no errors, the OneChiefInvestigator chained validator is run to ensure there is only one chief investigator.
If any of the validation checks fail, the form errors are encoded into a flat data structure using the variabledecode.encode() function so that each of the keys associated with the errors can be understood by htmlfill.render() and redisplayed next to the fields to which they refer.
Finally, if all the validation checks pass, the schema.to_python() method returns the decoded, validated, and converted values ready for your program to handle the data in whichever way it sees fit. Ordinarily, this would most likely be to save the data to a database before using h.redirect_to() to redirect the user to a page confirming the data had been saved. This example simply prints a message and displays the converted data structure.
Figure 6-6 shows the example during validation and with only one set of person fields added.
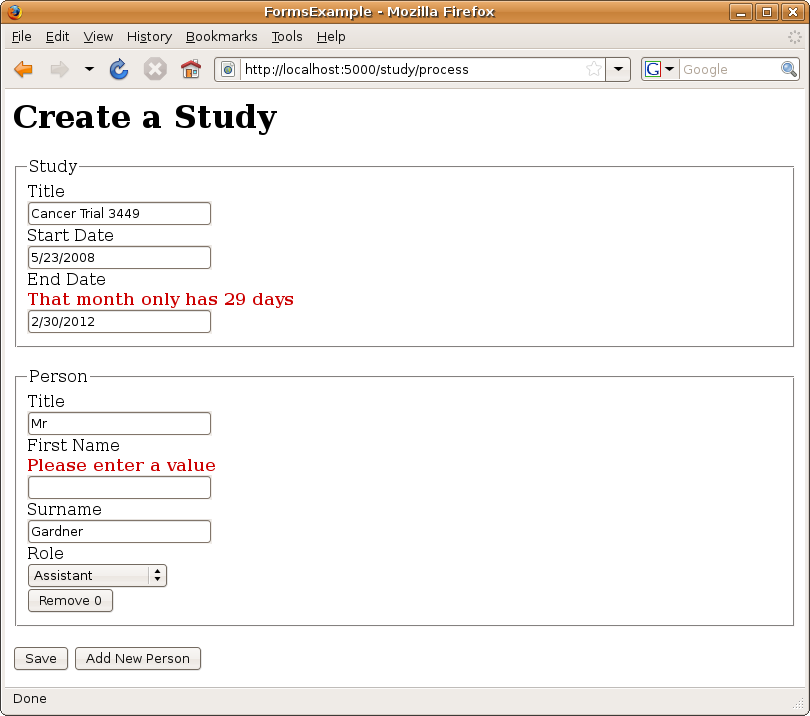
Figure 6-6. The repeating fields example in action
If you were to add some valid data, the result would be structured as shown here (although I’ve added some whitespace for clarity):
{
    'person': [
        {'surname': u'Gardner', 'role': u'2', 'firstname': u'James', 'title': u'Mr'}
    ],
    'start_date': datetime.date(2008, 5, 23),
    'end_date': datetime.date(2012, 2, 3),
    'title': u'Cancer Trial 3449'
}
Summary
Form handling can be a complex area, but in this chapter you learned the key principles involved in creating HTML forms, populating fields, validating complex data structures, and displaying error messages. By dealing with these processes individually, Pylons gives you the flexibility to create any sorts of forms your application needs.
In Chapter 15, you’ll revisit forms and see how you can use Ajax to make certain aspects of form handling slicker.