When people think about a model layer, they often immediately think of using a relational database management system (RDBMS) such as PostgreSQL or MySQL. In fact, there are many different ways to store your data in a Pylons application, so there are many different ways to model that data. It is important to decide on the correct approach for your particular needs. Some approaches might include these:
Pylons supports all of these approaches, but each has its advantages and disadvantages. If you are heavily relying on XML data, then an XML database makes sense. If you want to be able to manipulate and store Python objects that don’t need to be indexed quickly, an object database might suit your needs. If you are storing lots of binary data such as photographs or videos that don’t need to be searchable, you might store them in a third-party storage solution such as Amazon S3. And if you have large amounts of related data that needs to be quickly indexed, an RDBMS might be best.
In this chapter, I’ll cover these different approaches to storing information and then give you an in-depth look at how to use RDBMSs with SQLAlchemy in Pylons.
Storing Data in the Filesystem
There isn’t a great deal of point in storing data types such as photos, videos, and other binary data in a database because they take up a lot of space, which will slow down queries. It is much better to store binary data on the filesystem and store only key properties such as the filename or the creation date in a database.
You might be tempted to store your application’s data in your project’s data directory since it is already present and can be customized in your application’s config file. The disadvantage is that because it is already used to store temporary session, cache, and template information, other Pylons developers working on your project might be used to deleting it when they want to clear this temporary information. To avoid this problem, it is better to keep the data directory for cached information and to add a new directory for your user’s data. Let’s call ours attachments, but the location will be customizable in the config file too.
You could write code like this to load one of the files in this directory:
import os
from pylons import config

def load_file(filename):
    path = os.path.join(config['app_conf']['attachments'], filename)
    fp = open(path, 'rb')
    data = fp.read()
    fp.close()
    return data
You can save a file to the directory with a function like this:
def save_file(filename, data):
    path = os.path.join(config['app_conf']['attachments'], filename)
    fp = open(path, 'wb')
    fp.write(data)
    fp.close()
You can list all the files like this:
def list_files():
    path = os.path.join(config['app_conf']['attachments'])
    return os.listdir(path)
For this example, you’ll need to add a new variable in your project config file’s [app:main] section:
# You could customize this to specify something like /var/lib/myapp/attachments
# if you prefer
attachments = %(here)s/attachments
Each Pylons project has a model directory, which is where code for interacting with the application’s data should be stored so you can define the previous functions in model/__init__.py, for example.
You can get information about a particular file like this:
path = os.path.join(config['app_conf']['attachments'], filename)
size = os.path.getsize(path)
The os.path module documented at http://docs.python.org/lib/module-os.path.html has other similar methods for accessing other information about files such as getmtime(path), which returns the modification time.
For additional filesystem information, see the os.stat() function, which returns an object whose attributes correspond to the members of the stat structure, namely, st_mode (protection bits), st_ino (inode number), st_dev (device), st_nlink (number of hard links), st_uid (user ID of owner), st_gid (group ID of owner), st_size (size of file, in bytes), st_atime (time of most recent access), st_mtime (time of most recent content modification), and st_ctime (platform dependent; time of most recent metadata change on Unix or the time of creation on Windows). It can be used in two ways, as described in the module documentation at http://docs.python.org/lib/os-file-dir.html:
>>> import os
>>> statinfo = os.stat('somefile.txt')
>>> statinfo
(33188, 422511L, 769L, 1, 1032, 100, 926L, 1105022698,1105022732, 1105022732)
>>> statinfo.st_size
926L
>>> statinfo[7]
1105022698
You might want to turn the access and modification times into Python datetime objects and then format them in a different way:
>>> import datetime, time
>>> modified = datetime.datetime.fromtimestamp(statinfo[7])
>>> modified
datetime.datetime(2005, 1, 6, 14, 44, 58)
>>> modified.strftime("%Y-%m-%dT%H:%M:%S")
'2005-01-06T14:44:58'
It is sometimes useful to express in words when something happens. You can do so like this using the time_ago_in_words() function included with WebHelpers:
>>> from webhelpers.date import time_ago_in_words
>>> time_ago_in_words(modified)
'over 2 years'
It is also useful to express a file size in human-readable terms. Here’s a helper that does just that, which you can add to your project’s lib/helpers.py file and use as h.size_to_human():
def size_to_human(size, unit=1024, round=True):
    unit_name = 'bytes'
    size=int(size)
    if size > unit:
        size = size/float(unit)
        unit_name = 'KB'
    if size > unit:
        size = size/float(unit)
        unit_name = 'MB'
    if size > unit:
        size = size/float(unit)
        unit_name = 'GB'
    size = str(size)
    if round:
        if len(size)>4:
            size = "%d" % float(size)
    return size+' '+unit_name
Here is some further reading on filesystem use:
The shutil module’s copytree() function can be particularly useful on occasion.
Exploring Database Approaches
Storing data structures in files or via third-party storage solutions clearly isn’t the right approach for all data storage needs. Often the key requirement is to be able to search or select related sets of information. In that case, a database is a sensible way to go.
I’ll discuss the different types of databases you can use in your Pylons application.
Object Databases
If most of the data in your Pylons applications is in the form of classes, one very sensible way of storing that data is in an object database. An object database looks like a Python dictionary that is automatically saved to disk. You can store strings, numbers, dates, class instances, or even nested dictionaries and lists to create arbitrarily deep data structures. Compared to a regular Python dictionary, you have to call a few extra commands to open the database and commit changes, but reading/setting values works exactly like the normal Python operations. This avoids the complexity of converting a Python data structure to a non-Python medium (XML or RDBMS tables), and it allows you to quickly prototype a model because you can easily change and extend it.
Two object databases are available for Python: Durus and ZODB. Durus is smaller and simpler, while ZODB is the database used in large Zope applications. Durus is recommended only for databases with fewer than 1 million records.
Durus and ZODB can store only “pickleable” data types, in other words, those that can be serialized with Python’s pickle module. This includes all the standard data types including lists and dictionaries and instances of classes defined at the top level of their module. It does not include objects tied to external resources (an open file object or a database connection) or classes defined inside another class or inside a function. The Python standard library lists exactly which types can be pickled; see http://docs.python.org/lib/node317.html. Some users choose to store only built-in Python types (for example, dicts instead of class instances) to guarantee the data can always be unpickled on any Python system.
Both Durus and ZODB have a “persistent” class. Any object subclassing this will be saved and loaded separately rather than with its parent object.
The main disadvantage of object databases is that all searching is done in Python code, in for loops you write, while an RDBMS such as PostgreSQL has heavily optimized C routines for searching very quickly and with low memory overhead. Depending on the nature of your data and the types of searches you do, an RDBMS may or may not have a significant performance advantage. If you are considering using an object database, you should weigh this against the programming convenience of using the familiar and flexible Python types an object database provides.
Some users unfamiliar with object databases wonder how stable they are. Of course, this is a question you should ask about any database engine before trusting your data to it. Durus and ZODB use an append-only strategy with a simple filesystem layout to minimize the possibility of errors. Rather than overwriting objects, new versions are simply appended to the end of the file, and the old versions are abandoned. Backing up the data is a simple matter of copying the file. If the latest transaction at the end of the file gets corrupted or incompletely written, Durus and ZODB will simply truncate the file to return to the state that existed before the last transaction. Periodically the administrator runs a “pack” operation to rewrite the file without the abandoned sections, shrinking the file size.
Since the majority of Pylons developers use an RDBMS for their model, documentation on using ZODB or Durus is very thin. If an object database is an approach you’d like to consider, then these links might help:
- Durus
- http://www.mems-exchange.org/software/durus/, http://sluggo.scrapping.cc/python/pylons/pylons-durus.html
- ZODB
- http://pypi.python.org/pypi/ZODB3, http://en.wikipedia.org/wiki/ZODB (links to tutorials)
XML Databases
XML databases use XML documents as the unit of data they store and manipulate. If your Pylons application uses a lot of XML, it might make sense to store that information directly as XML in an XML database rather than storing it in another type of database. The following are the advantages of this approach:
- You don’t need to do any conversion between the data store and the document format your application uses.
- You can use query languages such as XPath and XQuery to quickly perform searches on documents in an optimized way.
Two XML databases you can use with Pylons are eXist and Berkeley DB XML:
- eXist XML database (http://exist.sourceforge.net/):
- The eXist server is written in Java but has XML-RPC and REST-style HTTP APIs that can be used from a Pylons application. Some parts of the main pylonshq.com web site currently use an eXist back end.
- Oracle Berkeley DB XML (http://www.oracle.com/database/berkeley-db/xml/index.html):
- This is an open source, embeddable XML database with XQuery-based access to documents stored in containers. DB XML has a Python binding that could be used to integrate it into a Pylons application. One thing to be aware of with DB XML is that the license would require that your Pylons application be released under the source license too unless you bought a commercial license from Oracle.
Relational Database Management Systems
Despite the advantages of object databases and XML databases for certain situations, the vast majority of people choose to use an RDBMS for the data persistence layer of their applications. Most of the time when people refer to a database, they mean an RDBMS such as MySQL, PostgreSQL, and many others. In the relational model, data and relationships can be represented in tables, rows, and columns that are defined and manipulated using a special language called Structured Query Language (SQL; pronounced “sequel”).
RDBMSs can be used in small, personal applications or in huge, multinational projects. Although the basic principles of how to use an RDBMS remain broadly the same in both cases, you will need a much greater understanding of how relational database management systems actually work in order to use them effectively in larger-scale projects because issues such as replication, failover, and partitioning become more important. These topics are beyond the scope of this book, but if you are interested, plenty of information is available online and in specialist books.
Object-Relational Mappers
Object-relational mappers (ORMs) are tools that map the data structures in your database, namely, the rows in each table to objects in your Pylons application. As you manipulate the objects in the application, they automatically generate the SQL necessary to manipulate the underlying data.
Using an object-relational mapper has a number of advantages:
- They make it much easier and more convenient to work with the underlying data.
- Your Pylons application will work on any of the database engines supported by the object-relational mapper you use.
- They usually deal with some of the complications such as connection pools and thread safety for you.
- They’re often easier to learn for newcomers than learning SQL.
Although object-relational mappers have major advantages, they are not without their weaknesses:
- By abstracting away the SQL, you generally have less control over the database than you would have had. Tools such as SQLAlchemy make up for this by also providing you with raw SQL access for the occasions when it is needed.
- If you don’t understand how object-relational mappers work, it is easy to write inefficient code that requires many SQL statements to be executed. (Careful reading of this chapter should prevent that problem, though.)
- Object-relational mappers can sometimes contain quite complex code that is necessary to make the interfaces they expose so easy to use. This means that if you run into a problem, it can be hard to track it down in the source code. By choosing a popular ORM such as SQLAlchemy, the chances are that there are a very few bugs, and any you find are likely to be dealt with quickly by the community.
Overall then, the benefits of object-relational mappers outweigh their disadvantages for the vast majority of Pylons developers.
Quite a few object-relational mappers are available for Python:
- SQLAlchemy (http://sqlalchemy.org) is a modern object-relational mapper and Python SQL toolkit with powerful features, excellent documentation and support, and a full-featured API. It provides a full suite of well-known enterprise-level persistence patterns, is designed for efficient and high-performing database access and exposes a simple and Pythonic API.
- Storm (https://storm.canonical.com/) is a new object-relational mapper from Canonical, the company behind Ubuntu Linux. It is simpler than SQLAlchemy with thorough unit tests. Storm is particularly designed to feel very natural to Python programmers and exposes multiple databases as stores in a clean and easy-to-use fashion.
- SQLObject (http://sqlobject.org) is a popular object-relational mapper for providing an object interface to your database, with tables as classes, rows as instances, and columns as attributes. SQLObject is fairly old now, and although it is still used in TurboGears 1 and some other older frameworks, most users now choose SQLAlchemy instead.
By far the most popular tool for use as a model in a Pylons application is SQLAlchemy, and with good reason. It is a very powerful tool that handles the vast majority of cases you are ever likely to need, has a large and helpful community behind it, and has extensive and accurate documentation. That’s not to say it is always the right tool for the job, and as you’ve seen so far in this chapter, Pylons is flexible enough to work with many different tools as a model. For the majority of cases, SQLAlchemy is a really good choice.
Setting Up SQLAlchemy
In this section, you’ll look at everything you need to install and set up in order to use SQLAlchemy.
SQLAlchemy relies on various DB-API 2.0 drivers to handle the actual connections to the RDBMS software. Before you can use SQLAlchemy in earnest, you need to download and install the DB-API 2.0 driver for the RDBMS software you want to use. Not all RDBMSs have a Python DB-API 2.0 driver, and not all Python DB-API drivers can be used with SQLAlchemy.
Table 7-1 outlines the major RDBMSs used by Pylons developers and the Python driver you need in order to be able to use them from Pylons. Other drivers are available for these RDBMSs, but at the time of writing, these are the drivers supported by SQLAlchemy.
It is worth noting that if you are using Python 2.5 or newer, you don’t need to install pysqlite, because it is already included as part of the Python standard library.
Table 7-1. Popular RDBMSs and the Corresponding DB-API Drivers
If you are just looking to get started quickly, SQLite is a good choice. You can download the latest SQLite 3 binary for your platform from http://www.sqlite.org/download.html. Once you have installed it, you will be able to run the sqlite3 command to get an interactive prompt:
$ sqlite3
SQLite version 3.4.0
Enter ".help" for instructions
sqlite>
You can type .help for help or .quit to quit.
I’ll use SQLite for the examples because it is so easy to set up, but you could equally well use any of the systems in Table 7-1. SQLite also has the advantage that the Python modules it needs are already included with Python 2.5 and newer.
Installing the DB-API Driver
Once you have installed, configured, and started the RDBMS you want to use, you need to install the appropriate DB-API 2.0 driver. In the case of SQLite, this is very easy because the software is automatically included with Python 2.5 or newer. If you are using Python 2.4 or older, you will need to install the driver in the same way you would for any RDBMS.
The driver you will need for your RDBMS is listed in Table 7-1 along with the URL where you can obtain it. Most Pylons-related software is available on the Python Package Index and can be installed with the easy_install command, but if you are not running on Windows, it is usually necessary to have a build environment set up with the Python development package and appropriate client library for the RDBMS you want to use already installed so that easy_install can compile the C or C++ libraries it needs to compile. For example, with MySQL, you might run this:
$ easy_install mysql-python
This would download the source for the MySQLdb module (this is a rare example when the package name is significantly different from the module name) and compile it. To compile it successfully, you will need the client library. For example, on Debian Etch, you would need to install the libmysqlclient15-dev package and the python-dev package.
Most commonly used software that isn’t on the Python Package Index will be available through your platform’s software repository. For example, versions of MySQLdb are available for Windows that you can install with its installer, and MySQLdb is available through the repositories for Debian, Ubuntu, Fedora, and other platforms. Mac OS X users can typically download a binary for the version of their operating system too.
If you are compiling a driver from source, it is always a good idea to read the software’s README or INSTALL files and to follow the instructions carefully. Bear in mind that you might need to use an older compiler than the one that comes with your platform.
Although installing a Python database driver sounds like it might be difficult, in practice it is normally easy because you can usually find a binary version.
If you are following along using SQLite and are using Python 2.4 or older, let’s install pysqlite2:
This installs the pysqlite2 module to use in your application, but note that the package name is pysqlite even though you need to import pysqlite2 to use the module.
Installing SQLAlchemy
Installing SQLAlchemy is easy. You simply specify the version you require with Easy Install, and it will be downloaded and installed for you. At the time of this writing, the latest version is 0.5, so the examples in this book are likely to work with any version above 0.5 and below 0.6. It is always wise to read the release notes for each new version, though:
$ easy_install "SQLAlchemy>=0.5,<=0.5.99"
If you want to ensure that your application uses only the version of SQLAlchemy you tested your application on, you should specify the version explicitly:
$ easy_install "SQLAlchemy==0.5.0"
Creating a Database
Now that you have the RDBMS software up and running, an appropriate DB-API driver, and SQLAlchemy itself, you will want to create a database.
Creating a database on the command line with SQLite is a simply a matter of connecting to it. The database is created if it doesn’t already exist:
You don’t actually need to create a database on the command line with SQLlite because a database will automatically be created for you when you connect from SQLAlchemy.
With other databases, things are a little more complex. PostgreSQL uses the createdb command, and MySQL uses a CREATE DATABASE SQL statement. Refer to your RDBMS documentation for the correct approach.
With everything in place, let’s take a look at SQLAlchemy’s architecture.
Exploring SQLAlchemy’s Architecture
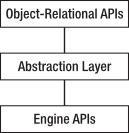
SQLAlchemy’s architecture contains a complete set of APIs, each representing one aspect of what is actually going on. Conceptually you can think of these APIs in three layers, each building on top of the previous one:
The abstraction layer consists of the SQL Expression API and the Metadata and Type APIs, which help isolate your Python code from the details of the underlying database engine. SQLAlchemy also includes a Declarative API, which you’ll learn about later in this chapter.
You’ll learn about each of these components in this chapter and see many of the key ways in which they are used.
Engine API
The lowest-level API you are likely to use is the Engine API. This represents a low-level abstraction of a database engine, allowing you to use the same API to create connections to different RDBMSs for sending SQL statements and for retrieving results.
In this section, I’ll show an example of how you might use an engine to directly execute some SQL. Let’s test this example using SQLite. Create a file called engine_test.py with the following content:
from sqlalchemy.engine import create_engine

engine = create_engine('sqlite:///:memory:')
connection = engine.connect()
connection.execute(
    """
    CREATE TABLE users (
        username VARCHAR PRIMARY KEY,
        password VARCHAR NOT NULL
    );
    """
)
connection.execute(
    """
    INSERT INTO users (username, password) VALUES (?, ?);
    """,
    "foo", "bar"
)
result = connection.execute("select username from users")
for row in result:
    print "username:", row['username']
connection.close()
To work with an engine, you need to have a connection to it. The connection in the example is an instance of a SQLAlchemy Connection object, and result is a SQLAlchemy ResultProxy object (very much like a DB-API cursor) that allows you to iterate over the results of the statement you have executed.
If you run this example, you’ll see the following output:
When using create_engine(), you can specify different data source names (DSNs) to connect to different databases. For example, with SQLite, you can use sqlite:///relative/path to specify a file relative to the current working directory. You can use sqlite:////absolute/path to specify an absolute path. SQLite also has a memory mode that doesn’t use the filesystem at all and loses all its information when the program exits. This can be very useful for testing. To use it, specify sqlite:///:memory: as the argument to create_engine(). The create_engine() function can also be used in a similar way with other RDBMSs. For example, to connect to the database my_database on a MySQL server at some.domain.com with the username foo and the password bar, you could use mysql://foo:bar@some.domain.com/my_database .
You’ll also notice that the values you inserted were passed as separate arguments to connection.execute() rather than as part of the SQL string. This is so that the values can be automatically encoded to the correct SQL types, which helps avoid the risk of SQL injection attacks, something you’ll learn more about later in the chapter.
Tip
Different databases use different markers (known as param styles) to label where the variables you pass to execute() should be inserted. The example above used SQLite which uses ? as the param style but if you tried to use MySQL or PostgreSQL you would need to use %s as the param style instead. The SQL would then look like this:
connection.execute(
    """
    INSERT INTO users (username, password) VALUES (%s, %s);
    """,
    "foo", "bar"
)
Using """ characters to mark the begining and end of the SQL allows you to use " and ' characters as part of the SQL and also allows you to add line breaks if your SQL statements get very long.
Notice also that you were able to access the username column using dictionary-like access to the row object. This is a feature of the SQLAlchemy ResultProxy object that was returned.
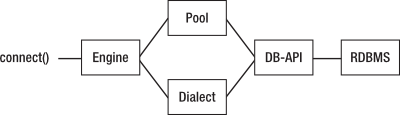
SQLAlchemy engines have a number of features over and above the Python DB-API connections you might be used to, not least the ability to automatically use pools of connections. Here’s a representation of the structure:
Let’s look at each part of this diagram. You’ve already seen how to use a connection to execute SQL statements and retrieve results, and you’ve seen how to create an engine object to represent the particular database you want to connect to within the underlying RDBMS. You also know that SQLAlchemy uses the underlying DB-API 2.0 driver behind the scenes to communicate with the RDBMS, so let’s look at dialects and pools.
Instances of Dialect objects tell SQLAlchemy how to deal with the subtleties of the different implementations of the DB-API 2.0 drivers to make some of SQLAlchemy’s internal code a little simpler, but you wouldn’t usually interact with them directly.
Pools, on the other hand, are more interesting. Aside from SQLite, most RDBMSs run as servers that the client connects to over a network. Each request that comes to the server and that needs to interact with a database will need its own database connection. Creating a connection can often be quite a costly exercise, and if you have a lot of requests, you will need to open and close lots of connections, which could impact the performance of your application. One solution to this problem is to have SQLAlchemy manage a pool of connections for you. When Pylons loads, SQLAlchemy can make a number of DB-API 2.0 connections to the underlying RDBMS and keep them open. When your application calls engine.connect() to obtain a connection, SQLAlchemy can return one of the connections from the pool rather than creating a new one. When you close the SQLAlchemy connection, it can return the DB-API connection to the pool ready to be used again the next time you call engine.connect(). This enables you to write your Pylons application in the same way you would if you were creating and closing lots of connections but have SQLAlchemy reuse connections from its internal pool.
You can configure pool options as arguments to the create_engine() function:
- pool_size
- The number of connections to keep open inside the connection pool.
- pool_recycle
- The length of time to keep connections open before recycling them. If not specified, the connections will stay open forever. This should be specified for MySQL in particular because servers typically close connections after eight hours, resulting in a “MySQL server has gone away” error.
- pool_timeout
- The number of seconds to wait before giving up on getting a connection from the pool.
Connection pools can quickly become quite complex, so if you are interested in using them, you should read the SQLAlchemy documentation for further information:
In the following sections, you’ll learn about other APIs you can use with SQLAlchemy including the Metadata, SQL Expression, and Object-Relational APIs. These APIs abstract away the engine and connections so that you don’t need to work with them directly. Behind the scenes, they will all use connections and engines to perform their work, so it is useful to understand how they work and, in particular, to know how to create engines with the appropriate options.
The flipside of this is that SQLAlchemy engines will work without any of the other SQLAlchemy infrastructure being in place so that even if you want to work directly with SQL rather than using the rest of SQLAlchemy’s powerful feature set, it makes sense to use an SQLAlchemy connection rather than a DB-API connection so that you get all of SQLAlchemy’s other benefits such as connection pools and result proxies.
You can find full information about engines and connections as well as threading implications in the excellent SQLAlchemy engine documentation at http://www.sqlalchemy.org/docs/05/dbengine.html.
Metadata and Type APIs
Now that you’ve seen how the Engine API has abstracted how SQL queries are executed and how results are returned, you can turn your attention to how SQLAlchemy abstracts the tables and other schema-level objects of the database itself. It does this with database metadata.
To represent the various different data types that table columns can store, SQLAlchemy uses its types system. Together the types system and metadata can completely describe the database schema in an RDBMS-independent manner.
The following is part of a table to store information about a page. Add this code to a new file called metadata_test.py.
from sqlalchemy import schema, types

metadata = schema.MetaData()

page_table = schema.Table('page', metadata,
    schema.Column('id', types.Integer, primary_key=True),
    schema.Column('name', types.Unicode(255), default=u''),
    schema.Column('title', types.Unicode(255), default=u'Untitled Page'),
    schema.Column('content', types.Text(), default=u''),
)
Here you’ve created a metadata object from schema.MetaData, which will hold all the information about the tables, columns, types, foreign keys, indexes, and sequences that make up the database structure. You’ll see more about how these are used later in the chapter.
You’ve then created a schema.Table object to describe the page table and passed it the metadata object. This is so that the table object can add information about the table to the metadata object. SQLAlchemy is then able to access the table information via the metadata object. Add the following to the end of the metadata_test.py file too:
for t in metadata.sorted_tables
    print "Table name: ", t.name
    print "t is page_table: ", t is page_table
If you run this example, you will see the following output:
$ python metadata_test.py
Table name:  page
t is page_table: True
As you can see, the metadata object contains information about the tables, and the table object assigned to t in this example is the same as the page_table object.
Each of the columns that makes up the tables has its own type. SQLAlchemy supports the following built-in types:
- String
- Unicode
- Text/UnicodeText
- Numeric
- Float
- Datetime/Date/Time
- Interval
- Binary
- Boolean
In addition to the types listed here, there is a PickleType that is based on SQLAlchemy’s Binary type. PickleType uses Python’s pickle.dumps() to “pickle” objects being saved to the database, and it uses pickle.loads() to unpickle objects being retrieved. It therefore allows you to store any pickleable Python object as a serialized binary field. The same rules about which Python objects can be pickled apply whether you are using the PickleType field with SQLAlchemy or whether you are using an object database such as Durus or ZODB. Have a look at the Python documentation at http://docs.python.org/lib/node317.html for more information.
SQLAlchemy also supports some dialect-specific types to handle columns that occur only in particular databases. You can even create your own types if you need to do so. For full information, look at the SQLAlchemy types documentation at http://www.sqlalchemy.org/docs/05/types.html.
You can get information about the columns used in a table via the table’s .columns attribute. Add the following to the end of the metadata_test.py example:
for column in page_table.columns:
    print "Column Table name: ", column.type
If you run it again, you’ll see this output including the column information:
$ python metadata_test.py
Table name:  page
t is page_table: True
Column:  Integer()
Column:  Unicode(length=255)
Column:  Unicode(length=255)
Column:  Text(length=None, convert_unicode=False, assert_unicode=None)
At this stage, the metadata is just information; it doesn’t relate to any properties of a real database. To connect the metadata to a real database, you need to bind the metadata object to an engine.
Add the following to the end of the metadata_test.py example:
from sqlalchemy.engine import create_engine

engine = create_engine('sqlite:///:memory:')
metadata.bind = engine
At this point, the metadata is connected to the database via the engine. Once again, I’ve chosen to use an in-memory SQLite database for the example, but you are free to use different parameters to create_engine() if you prefer.
Tip
It is worth being aware that you can have SQLAlchemy automatically convert all string types to handle Unicode automatically if you set up the engine like this:
create_engine('sqlite:///:memory:', convert_unicode=True)
In this book, you will instead use the Unicode type explicitly when you want to work with Unicode strings, but some Pylons developers prefer to take this shortcut.
SQLAlchemy now has enough information to allow you to start manipulating the database with the SQL Expression API, but the metadata object has a few more tricks. If the tables described by the metadata don’t actually exist in the database, the metadata object can be used to create them. Add this line to the end of the metadata_test.py file:
metadata.create_all(checkfirst=True)
The checkfirst=True argument means it will create the table only if it doesn’t already exist.
You’ll notice that you didn’t need a connection in order to create the tables. This is because the metadata object creates and closes a connection automatically from the engine.
If tables exist in the database that have not yet been defined in the metadata object, you can have SQLAlchemy automatically reflect the information like this:
comment_table = schema.Table('comment', metadata, autoload=True)
There are plenty of other things you can do to specify information about the schema. The following are all supported:
- Overriding some of the metadata for columns obtained by reflection
- Specifying the schema name for databases that support the concept of multiple schemas
- Cascading updates and deletes for databases supporting them
- Handling database-specific options such as MySQL’s table back ends including InnoDB or MyISAM
- Default values
- Dropping tables
- Adding constraints, indexes, sequences, and more
These are all described in detail at http://www.sqlalchemy.org/docs/05/metadata.html.
SQL Expression API
Once you have set up all the database metadata, SQLAlchemy has all the information it needs for you to be able to use its SQL Expression API.
The SQL Expression API enables you to build SQL queries programmatically using Python objects and operators. This can take a lot of the pain out of SQL because you don’t have to worry about converting Python values to safe SQL strings.
Let’s create a new file called sqlexpression_test.py and add the following to it:
from metadata_test import engine, page_table
You can now use the page table to perform simple operations. Here’s how you might perform a simple insert operation. Add the following to sqlexpression_test.py too:
print "\nSQL Expression Example\n"

connection = engine.connect()

ins = page_table.insert(
    values=dict(name=u'test', title=u'Test Page', content=u'Some content!')
)
print ins
result = connection.execute(ins)
print result

connection.close()
If you run this example, the output from metadata_test.py will be displayed first because you imported that file; then it will be followed by the output from sqlexpression_test.py, which looks like this:
SQL Expression Example

INSERT INTO page (name, title, content) VALUES (?, ?, ?)
<sqlalchemy.engine.base.ResultProxy object at 0x58c3f0>
The ins object automatically generates the correct SQL to insert the values specified, and an instance of a ResultProxy object (which you saw in the Engine API description) is returned to allow you to iterate over the results. Since this is an insert statement, there won’t be any interesting values returned.
As an alternative, you could have written the same code like this:
print "\nSQL Expression Example\n"

ins = page_table.insert(
    values=dict(name=u'test', title=u'Test Page', content=u'Some content!')
)
print ins
result = ins.execute()
print result
In this case, the opening/closing of the connection is handled by the metadata object associated with the page_table object. It is usually better to execute SQL Expression objects like ins via connection.execute() so that you always know precisely which connection is being used. This becomes particularly important when you are using the Object-Relational API within Pylons with a scoped session when you probably want to use the connection used by the session rather than letting the metadata object create a connection for you. You’ll see how this works in Chapter 8.
Note
Because you are still using a SQLite in-memory database, each time this code is run, the database is created, the table is created, and the data is inserted. Once the code is executed, everything is lost so that when the code is run again, no errors occur. If you were to use a permanent database, you would need to drop the page table before rerunning the code.
SQL Injection Attacks
The most important point about the sqlexpression_test.py code is that SQLAlchemy handles any type conversion of the values you specified to insert() using its types system. This is important because if you build the SQL strings yourself using values that a user has submitted, there is a chance you might not perform the conversions quite correctly. This can expose your application to a particular type of attack called a SQL injection attack.
As an example, consider this action:
# This is really BAD, don't do it!
def create(self):
    name = request.params['name']
    title = request.params['title']
    sql = "INSERT INTO page (name, title) VALUES ('%s', '%s')" % (name, title)
    connection.execute(sql)
    return "Page added"
If the user submits the values NewPage for the name variable and New Page for the title, everything works perfectly well. An attacker might instead submit the values NewPage and New Page'); DROP TABLE page; --. At first sight this just looks very odd, but consider the SQL string your application now builds; it actually looks like this:
INSERT INTO page (name, title) VALUES ('NewPage', 'NewPage'); DROP TABLE page; --')
In SQL, -- comments out the rest of the line, so the following statements would be executed without a syntax error, dropping the page table and removing all its data:
INSERT INTO page (name, title) VALUES ('NewPage', 'NewPage');
DROP TABLE page;
This clearly isn’t what you wanted, which is why it is so important to let SQLAlchemy handle conversions for you using the SQL Expression API rather than writing SQL strings yourself, because the variables would have been correctly escaped and the page would just have had a very odd-looking title.
Selecting Results
Here’s a simple select statement that explicitly uses the connection object from the engine. Add it to the end of the sqlexpression_test.py file before the connection.close() line:
print "\nSelecting Results\n"

from sqlalchemy.sql import select

s = select([page_table])
result = connection.execute(s)
for row in result:
    print row
Before you test this example, it is useful to know about SQLAlchemy’s echo option, which tells the engine object to log all the SQL it executes to sys.stdout so you can see what SQLAlchemy is doing behind the scenes. Edit metadata_test.py, and add echo=True to the create_engine() function so it looks like this:
engine = create_engine('sqlite:///:memory:', echo=True)
Now when you run the example, you’ll be able to see the SQL SELECT statement SQLAlchemy will actually use without needing to manually add print statements. This can be useful when running test scripts to try different aspects of SQLAlchemy’s functionality but shouldn’t be enabled when you are using Pylons, because depending on the server and logging configuration you are using, it might result in messages going either to the error log or being sent to the browser. Instead, you can use Pylons’ logging system to log SQLAlchemy messages in a much more structured way. This is described in Chapter 20.
If you run this example now, you will see the following at the end of the output:
Selecting Results

2008-09-04 16:01:22,294 INFO sqlalchemy.engine.base.Engine.0x..90 SELECT page.id, page.name, page.title, page.content
FROM page
2008-09-04 16:01:22,294 INFO sqlalchemy.engine.base.Engine.0x..90 []
(1, u'test', u'Test Page',  u'Some content!')
As you can see, this results in the SQL statement SELECT page.id, page.name, page.title, page.content FROM page being executed.
You can also specify WHERE clauses using a similar construct. For example, to specify pages that have an id greater than 1, you would write this:
s = select([page_table], page_table.columns.id>1)
result = connection.execute(s)
print result.fetchall()
You’ll remember from the the “Metadata and Type APIs” section earlier in the chapter that table objects have a .columns attribute. The object returned contains a Column instance for each column in the table and these can be accessed as attributes based on the column name. In the example the id column can therefore be accessed as page_table.columns.id. SQLAlchemy knows how the standard Python operators should interact with the column objects to generate the appropriate SQL.
If you added this to the example, the extra output printed as a result of setting echo=True would be as follows:
2008-09-04 16:16:10,891 INFO sqlalchemy.engine.base.Engine.0x..b0 SELECT page.id, page.name, page.title, page.content
FROM page
WHERE page.id > ?
2008-09-04 16:16:10,891 INFO sqlalchemy.engine.base.Engine.0x..b0 [1]
[]
As you can see, the SQL WHERE page.id > ? has been added to the query, and the [1] shows that the value 1 will be substituted into the query in place of the ? character to execute the correct query.
Once again, a ResultProxy object is returned, but this time you use its fetchall() method to return all the results in one go. Since there is only one page and its id is not greater than 1, there are no results, so an empty list is returned. The ResultProxy object also has fetchone() and fetchmany(), which are similar to their DB-API 2.0 counterparts.
If you have a complex WHERE clause, it can be cumbersome to keep typing page_table.columns, so SQLAlchemy also allows you to write page_table.c. The .c attribute is just an alias to the same object you access using .columns but is shorter to type.
SQLAlchemy overloads most of the Python operators for use in WHERE clauses so that they behave the way you would expect when used in SQL. You’ve seen how to use > in the previous example, but the operators ==, <, <=, >=, and != have similar results.
SQLAlchemy also provides operators for AND, OR, and NOT in the form of the Python operators &, |, and !. If you use these, you have to be careful to correctly add parentheses to all the expressions you are operating on because Python operator precedence is slightly different from that of SQL. Here’s an example:
s = select([page_table], (page_table.c.id<=10) & (page_table.c.name.like(u't%')))
Notice that you were able to use a LIKE clause too as a method of the name column.
If you don’t want to use the &, |, and ! operators, SQLAlchemy also provides and_(), or_(), and not_() functions that you can use instead:
from sqlalchemy.sql import and_, or_, not_
s = select([page_table], and_(page_table.c.id<=10, page_table.c.name.like(u't%')))
result = connection.execute(s)
print result.fetchall()
This has the same effect. If you add this to the end of the sqlexpression_test.py file before connection.close() and run the program, the corresponding output is as follows:
2008-09-04 16:34:27,014 INFO sqlalchemy.engine.base.Engine.0x..b0 SELECT page.id, page.name, page.title, page.content
FROM page
WHERE page.id <= ? AND page.name LIKE ?
2008-09-04 16:34:27,015 INFO sqlalchemy.engine.base.Engine.0x..b0 [10, u'%t']
[(1, u'test', u'Test Page', u'Some content!')]
As you can see, the WHERE clause has been generated correctly, and this time the values 10 and t% replace the two question marks in the SQL query. This time the query results in the row being returned again.
One operator that behaves slightly differently from the others is the + operator. If + is operating on two strings, it generates the appropriate SQL for concatenation. If it operates on two integers, it produces the SQL to add them together:
>>> print page_table.c.name + user_table.c.title
page.name || user.title
>>> print page_table.c.id + comment_table.c.id
page.id + comment.id
The SQL builder assembles chunks of SQL, and printing them displays the SQL. Notice that it has correctly added the || operator, which causes the strings to be concatenated in most RDBMSs. MySQL is slightly different, though. It requires strings to be concatenated with the concat() function. SQLAlchemy even does the right thing with MySQL. On MySQL you get this:
>>> print page_table.c.name + user_table.c.title
concat(page.name, user.title)
Once you have generated a select object, you can still add extra clauses to it. For example, if you wanted to add an ORDER_BY clause, you could write this:
s = select([page_table], and_(page_table.c.id<=10, page_table.c.name.like(u't%')))
s = s.order_by(page_table.c.title.desc(), page_table.c.id)
This would run the same query as before but order by title descending and then by id.
You can write update statements like this:
print "\nUpdating Results\n"

from sqlalchemy import update

u = update(page_table, page_table.c.title==u'New Title')
connection.execute(u, title=u"Updated Title")
If you add the previous to the sqlexpressions_test.py file before connection.close() and execute it again, the corresponding UPDATE statement looks like this:
Updating Results

2008-09-04 17:00:58,673 INFO sqlalchemy.engine.base.Engine.0x..d0 UPDATE page SET title=? WHERE page.title = ?
2008-09-04 17:00:58,673 INFO sqlalchemy.engine.base.Engine.0x..d0 [u'Updated Title', u'New Title']
2008-09-04 17:00:58,674 INFO sqlalchemy.engine.base.Engine.0x..d0 COMMIT
Notice that SQLAlchemy automatically sent a COMMIT message to save the changes.
Finally, let’s look at deleting rows. The pattern should be getting very familiar now. You can write delete statements like this:
print "\nDeleting Row\n"

from sqlalchemy import delete

d = delete(page_table, page_table.c.id==1)
connection.execute(d)
If you add the previous to the sqlexpressions_test.py file before connection.close() and execute it again, the corresponding DELETE statement looks like this:
Deleting Row

2008-09-04 17:04:34,460 INFO sqlalchemy.engine.base.Engine.0x..f0 DELETE FROM page WHERE page.id = ?
2008-09-04 17:04:34,460 INFO sqlalchemy.engine.base.Engine.0x..f0 [1]
2008-09-04 17:04:34,461 INFO sqlalchemy.engine.base.Engine.0x..f0 COMMIT
The important thing to note about all these examples is that the code you write with the SQL Expression API will have the same effect on any of the RDBMSs that SQLAlchemy supports without you having to change any of your code. The only thing you need to change is the URI string to the create_engine() function. This automatic abstraction is a huge advantage if you are trying to write Pylons applications to work on multiple database back ends.
This has been a taste of the SQL Expression API, but there is a lot more too. It is extremely powerful, allowing you to do complex joins, aliases, group bys, functions, unions, other set operations and more, all through natural-feeling Python code based on information defined through the metadata in your tables and columns.
Once again, the SQLAlchemy documentation is the best place to go to learn about all the features: http://www.sqlalchemy.org/docs/05/sqlexpression.html
Exploring the Object-Relational API
The highest-level API SQLAlchemy provides is the Object-Relational API, which is the one you will spend the majority of your time using in your Pylons applications. The API allows you to work directly with Python objects without needing to think too much about the SQL that would normally be required to work with them.
Before you learn about the details of how the API works, I’ll cover some key concepts about relational databases.
Object-Relational Principles
As you learned earlier in the chapter, object-relational mappers (ORMs) map rows from tables in relational databases to the objects used in your Pylons application.
The difficulty is that Python objects don’t always easily map to rows in tables. Before you look at SQLAlchemy’s Object-Relational API, let’s take a few moments for a very quick overview of the core ideas of relational databases that you need to know to use SQLAlchemy effectively.
Let’s consider a wiki application that allows the creation of pages, has a comments system, and allows pages to be tagged. Each of the items mentioned in the previous sentence are known as entities in relational database terminology. They are the main things that exist in the real world. Ordinarily, each entity in the real world is represented by a table in the database, and each row in the table represents one instance of the entity. In our example, you would therefore need three tables: page, comment, and tag.
Each row in each of the tables must have something unique about it that differentiates it from other rows in the table. In the case of wiki pages, this might be the page title or the URL of the page. A unique identifier of this type is called the primary key of the table. In the case of a wiki, you might choose to the use the page title as the primary key if each page title is different. This could cause a problem if the page title was able to change. To avoid this problem, all modern databases can assign an ID to a row automatically when the row is inserted into the table. By using an automatically assigned ID, you can be sure that all rows in a table have a different ID and that if any of the other properties change, the record will still be able to be accessed via a primary key lookup.
If you are designing a database structure for use with SQLAlchemy, it is a good idea to add an id column to each table as a primary key. The rest of the examples in this book will use this approach.
Once the primary entities have been represented in tables with each row having a primary key, you need to think about how the different entities are related. There are three common ways they might be related:
- One to one
- Data items in two tables both represent the same entity; it is just that you have chosen to store the fields in different tables. Most of the time, you will avoid one-to-one relationships because they are an indication that you might not have properly understood the key entities in your data structure.
- One to many
- One entity has zero or more instances of another entity associated with it.
- Many to many
- Zero or more instances of one entity are associated with zero or more instances of another entity.
Thinking about entities and mappings can be a bit abstract, so I’ll show a wiki comments system as a concrete example.
Each wiki page can have lots of different comments, but the same comment won’t appear on more than one page. This means there is a one-to-many mapping between pages and comments.
The best way to represent a one-to-many mapping is by adding what is known as a foreign key to the comments table to store the id of the page to which the comment has been added. An appropriate name for the column to hold the foreign key might be pageid. This means that to find all the comments on, say, page 5, you would select all the comments in the comments table where pageid is 5.
So far so good. Now let’s think about the tags that are a little more complicated. Once again, pages can have multiple tags, but this time the same tag can also be used on multiple pages. You have a many-to-many relationship. This time the relationship can’t be modeled by adding a foreign key to the tag table because although this would allow you to work out the tags used on a particular page, it wouldn’t allow you to work out which pages used a particular tag unless you had duplicate tags in the tags table.
Creating duplicates of primary entities is often bad practice, so the only way to model the relationship between tags and pages is with a third table. We’ll call it pagetag. The pagetag table will have three columns, a foreign key to the page table, a foreign key to the tag table, and a primary key of its own. Here’s an example of the data the tables might contain:
page table
+-----+------------------+-------------+---------------+
| id  | content          | posted      | title         |
+-----+------------------+-------------+---------------+
| 1   | When I was...    | 2007-05-08  | The Other Day |
| 2   | Databases are... | 2007-07-13  | Databases     |
+-----+------------------+-------------+---------------+

tag table
+-----+------------+-------------+
| id  | name       | created     |
+-----+------------+-------------+
| 1   | databases  | 2007-07-13  |
| 2   | life       | 2007-03-10  |
| 3   | fun        | 2007-04-28  |
| 4   | news       | 2008-03-30  |
+-----+------------+-------------+

pagetag table
+-----+-------+----------+
| id  | tagid | pageid   |
+-----+-------+----------+
| 1   | 1     | 2        |
| 2   | 2     | 1        |
| 3   | 3     | 1        |
| 4   | 3     | 2        |
+-----+-------+----------+
In this example, the tags databases and fun are associated with page 2, and life and fun are associated with page 1. Looking at the same data from the tags perspective, you can see that the fun tag is used on two pages, whereas the others are only associated with one page each. You can also see that the news tag hasn’t been used on any pages yet.
To find out the tag names associated with page 2, you would use a SQL JOIN to find all the rows in the pagetag table with a pageid of 2 and then use the corresponding tagid to look up the name of the tag from the tag ID.
Writing SQL joins of this type isn’t complicated, but it can be time-consuming. Wouldn’t it be nice if you could just have a page object and get the tag names like this?
for tag in page.tags:
    print tag.name
This is precisely what you can do with SQLAlchemy’s Object-Relational API. In the next sections, you’ll look at how to set up the table, class, and mapper objects necessary to make this sort of API access possible.
Classes and Mappers
Now that you have defined the table structures, turn your attention to the classes and mappers. Here’s what the Page class looks like; add it to the end of the model.py file:
Similar classes would need to be created for comments and tags; add them to the end of model.py too:
class Comment(object):
    pass

class Tag(object):
    pass
Tip
Although I’ve chosen to create the classes you need without any extra methods, one popular way of setting up the classes is to have an __init__() method that takes arguments for each of the required fields in the table and sets them as class attributes. This setup helps you remember to always set all the required attributes because you can’t create objects without them.
You might also like to add a customized __repr__() method to each of your classes that includes representations of key attributes such as the primary key. This can make it clearer which objects you are looking at if you interact with your model from the command line or via the Pylons interactive shell, which you’ll see used for testing in Chapter 12 and used to interact with your model in Chapter 19.
So far, the Page class is still just a class and has nothing to do with the page table. To map the class to the table, you use a mapper. A simple mapper for Page might look like this (you’ll need a more complex one, though):
orm.mapper(Page, page_table)
The mapper() function creates a new Mapper object and stores it away for future reference. It also adds the column names of the page table as attributes of the Page class so that class attributes correspond to table column names. SQLAlchemy keeps track of any changes to those attributes so the database can be automatically updated.
The Page class actually has a relationship to the comments table as well as the page table because pages can have multiple comments. You can specify this relationship like this:
orm.mapper(Page, page_table, properties={
    'comments':orm.relation(Comment, backref='page')
})
This tells SQLAlchemy that the Page class is mapped to the page_table table but that page objects should have an extra property called comments, which should return all the Comment objects related to that page when you read its .comments property. The relation() function also takes a backref argument, which means that all comment objects should also have a property named page that returns the page object to which a particular comment is related.
By using this single definition, you have therefore been able to define the relationship between pages and comments and also specify the properties on each, which will return instances of the other.
In fact, pages are related to tags as well as to comments, so you need a slightly more sophisticated call to orm.mapper().
Add this import to the top of the model.py file:
from sqlalchemy import orm
Add this version of the mapper code to the end of model.py:
orm.mapper(Page, page_table, properties={
   'comments':orm.relation(Comment, backref='page'),
   'tags':orm.relation(Tag, secondary=pagetag_table)
})
This is the same as the previous example but also specifies a tags property to relate the page to the tag objects associated with it. This call to relation() specifies a secondary table, pagetag_table, to be used to handle the many-to-many relationship between pages and tags. Once again, SQLAlchemy can work out the details from the metadata definitions of the tables and columns. All many-to-many relations should have the secondary argument to specify how the tables are related.
Now that you’ve mapped the Page class, let’s look at the mappers for Tag and Comment. They look like this and are the last lines you’ll need to add to model.py:
orm.mapper(Comment, comment_table)
orm.mapper(Tag, tag_table)
The mapper for Comment doesn’t need the page property specified because the mapper for Page has already specified it via the backref. The mapper for Tag doesn’t need to have the relation to Page specified because SQLAlchemy can already work it out via the secondary argument.
In this example, the Comment and Tag mappers actually need to be specified before the mapper for Page because the classes are used in the properties of the Page mapper. You sometimes have to think quite carefully about the order mappers are defined in order to be able to specify all the relationships correctly in Python code.
One point to note is that this setup doesn’t provide a way to get a list of pages that share one tag because you haven’t specified a backref on the tags property in the Page mapper, but you can always use a query if you need that information. When designing your mappers, there is a trade-off between adding relational structure to express an important structure or to simplify accessing data that is frequently used vs. the simplicity of using queries for things that might only occasionally be used.
Once again, SQLAlchemy has many more features than can be described here including lazy and eager loading, mapping to joins, and more. The SQLAlchemy documentation is very good and has all the details.
Tip
When you are thinking about naming table columns, it is a strongly recommended that you don’t start any of the column names with _. SQLAlchemy adds certain objects to mapped class instances, and each of these starts with _, so you won’t want to create names that conflict with SQLAlchemy objects.
Understanding the Session
There is one problem I haven’t discussed yet, and that is how SQLAlchemy manages objects in memory. After all, it wouldn’t be efficient for it to contact the database every time you accessed an attribute of an object. SQLAlchemy handles this problem by keeping track of objects in memory in what it calls a session.
Caution
The SQLAlchemy session is completely unrelated to the Beaker session, which provides session management between requests using a cookie. It’s unfortunate that two different pieces of software chose the term session to mean completely different things.
SQLAlchemy provides different configuration options for the session depending on the type of application you are writing. You can read all about the various options in the SQLAlchemy documentation, but in this section you’ll use the same configuration options used by Pylons. You’ll also use the model.py you’ve just created.
Create a new file called object_test.py in the same directory as model.py, and add the following content:
import model
from sqlalchemy import orm
from sqlalchemy import create_engine

# Create an engine and create all the tables we need
engine = create_engine('sqlite:///:memory:', echo=True)
model.metadata.bind = engine
model.metadata.create_all()

# Set up the session
sm = orm.sessionmaker(bind=engine, autoflush=True, autocommit=False,
    expire_on_commit=True)
session = orm.scoped_session(sm)
Let’s look at this in detail. First you have a number of imports including the model module you created earlier. Next you create an engine as you’ve done before using the echo=True argument so that the SQL being generated behind the scenes gets output to the console (remember that you shouldn’t use this argument in a Pylons application and instead should use the logging technique described in Chapter 20). Finally, you get into the interesting part and create the session itself.
In this example, the session is created in two parts. First you use a sessionmaker() function to return an object for building the particular type of session you want. To understand what the options mean, you need to know a little terminology. In SQLAlchemy, flushing is the process of updating the database with the changes made to the objects you have been working with, and committing is the process of sending a COMMIT statement to the database to make those flushes permanent. If you were to roll back some changes after they had been flushed but before the changes were committed, then the changes would be lost. With these definitions in mind, let’s look at the arguments.
Let’s look at the arguments being used:
- bind=engine
- This ensures that the session is bound to the same engine to which the metadata object is bound. The session will automatically create the connections it needs.
- autoflush=True
- If you commit your changes to the database before they have been flushed, this option tells SQLAlchemy to flush them for you before the commit goes ahead. This ensures changes aren’t lost because you forgot to flush them.
- autocommit=False
- This tells SQLAlchemy to wrap all changes between commits in a transaction so that the commit and rollback behavior just described works correctly in RDBMSs that support this feature. If you specified autocommit=True, SQLAlchemy would automatically commit any changes after each flush, which normally isn’t what you want. If a problem happens halfway through a Pylons request, it is usually important that all uncommitted changes made up to that point are not saved so that the database isn’t left in a half-changed state. If you’ve used SQLAlchemy in earlier versions of Pylons such as 0.9.6, you may have noticed that the argument transactional=True was used. autocommit=False in SQLAlchemy 0.5 is the same as transactional=True in earlier versions, so the two arguments do the same thing.
- expire_on_commit=True
- This happens to be the default value anyway, but it means that all instances attached to the session will be fully expired after each commit so that all attribute/object access subsequent to a completed transaction will load from the most recent database state.
The second part of the session creation code is the call to scoped_session(). As you’ve already learned, Pylons is a multithreaded framework. If you were to use an ordinary SQLAlchemy session in Pylons, different requests would change the session at the same time, which would result in some users seeing other people’s data, other users not seeing data they’d entered, and frequent application crashes. The scoped_session() object ensures that a different session is used for each thread so that every request can have its own access to the database. Although you don’t need this to run the test examples in this chapter, you will need to understand it to work with SQLAlchemy in a Pylons application, so it is worth learning the details now.
Exploring the Session
Now that you’ve seen how the session is configured, let’s run through some examples of how it is used and see the effects the configuration options chosen actually have. For this part of the chapter, I’ll use an interactive Python prompt to execute commands so that you can see when SQLAlchemy actually generates the SQL. Start a prompt in the same directory where you’ve been writing the modules:
$ python
Python 2.5.1 (r251:54863, Apr 15 2008, 22:57:26)
[GCC 4.0.1 (Apple Inc. build 5465)] on darwin
Type "help", "copyright", "credits" or "license" for more information.
>>>
Now import the session object from the object_test module you just created:
>>> from object_test import session
A load of output will fly by as SQLAlchemy sets up the tables. Now let’s start by importing the model module and creating a new page:
>>> import model
>>> test_page = model.Page()
>>> test_page.title = u'Test Page'
>>> test_page.content = u'Test content'
>>> test_page.title
u'Test Page'
The first step toward persisting the test_page object is adding it to the session so that SQLAlchemy is aware of it:
>>> session.add(test_page)
If you were creating lots of pages at once, you could use session.add_all([test_page1, test_page2, test_page3]) instead. SQLAlchemy 0.4 used session.save() instead but session.add() is the correct method to use for SQLAlchemy 0.5 and above.
At this stage, objects added to the session are still pending, and no SQL has been issued or echoed to the console. Let’s see what happens when you access the test_page object’s .id attribute:
>>> print test_page.id
None
As you can see, it returns None. You’ll remember from the table definition that id is the page table’s primary key column and that an id value is automatically assigned by the underlying RDBMS when the row is created. At this stage, although test_page has been added to the session, its data hasn’t been sent to the underlying RDBMS. You can force this to happen by flushing the session. Once the session has been flushed, the SQL is sent, and SQLAlchemy finds out the id of the page:
>>> session.flush()
2008-09-04 20:53:55,191 INFO sqlalchemy.engine.base.Engine.0x..90 BEGIN
2008-09-04 20:53:55,193 INFO sqlalchemy.engine.base.Engine.0x..90 INSERT INTO page (content, posted, title, heading) VALUES (?, ?, ?, ?)
2008-09-04 20:53:55,194 INFO sqlalchemy.engine.base.Engine.0x..90 [u'Test content', '2008-09-04 20:53:55.193033', u'Test Page', None]
As you can see, SQLAlchemy has now sent the INSERT statement to the SQLite database, but the interesting thing is that it also sent the SQL keyword BEGIN before it sent the INSERT statement. This starts a transaction within the RDBMS so that any changes can still be rolled back until they are committed. It also means that the changes won’t yet be visible to other users.
Caution
Some RDBMSs don’t support transactions and therefore cannot roll back data or hide it from other users after it has been flushed. MySQL’s default MyISAM tables don’t support transactions, so if you need this functionality, you should use InnoDB tables instead. If you are using MySQL, you can specify this by adding mysql_engine='InnoDB' to your Table classes. See http://www.sqlalchemy.org/docs/05/documentation.html#metadata_tables_options for more information.
Let’s see whether the test_page has an id now that the test page has been flushed:
As you can see, id has now been assigned. Notice that SQLAlchemy didn’t need to query the database again to tell you. Now let’s commit the changes:
>>> session.commit()
2008-09-04 20:54:13,189 INFO sqlalchemy.engine.base.Engine.0x..90 COMMIT
SQLAlchemy sends the COMMIT statement that permanently commits the flushed changes and ends the transaction.
Let’s access the test page’s id again and see what happens:
>>> test_page.id
2008-09-04 21:08:19,024 INFO sqlalchemy.engine.base.Engine.0x..30 BEGIN
2008-09-04 21:08:19,027 INFO sqlalchemy.engine.base.Engine.0x..30 SELECT page.id AS page_id, page.content AS page_content, page.posted AS page_posted, page.title AS page_title, page.heading AS page_heading
FROM page
WHERE page.id = ?
2008-09-04 21:08:19,027 INFO sqlalchemy.engine.base.Engine.0x..30 [1]
1
This time, SQLAlchemy reads the data from the database again. This might surprise you, but if you look back at the session creation code, you’ll recall that the expire_on_commit option was set to True, causing SQLAlchemy to automatically expire all objects attached to the session. Notice that SQLAlchemy actually fetched all the attributes, not just the id. If you access the id or any of the page’s other attributes, they will now be loaded from the session without access to the database:
>>> test_page.id
1
>>> test_page.title
u'Test Page'
The default values for the columns will also have been applied, so you can now also access the page’s posted attribute:
>>> test_page.posted
datetime.datetime(2008, 9, 4, 21, 3, 34, 975799)
Let’s now delete this object:
>>> session.delete(test_page)
Once again, no SQL is sent until you flush the session:
>>> session.flush()
008-09-04 21:39:13,247 INFO sqlalchemy.engine.base.Engine.0x..30 SELECT comment.id AS comment_id, comment.pageid AS comment_pageid, comment.content AS comment_content, comment.name AS comment_name, comment.email AS comment_email, comment.created AS comment_created
FROM comment
WHERE ? = comment.pageid
2008-09-04 21:39:13,248 INFO sqlalchemy.engine.base.Engine.0x..30 [1]
2008-09-04 21:39:13,255 INFO sqlalchemy.engine.base.Engine.0x..30 SELECT tag.id AS tag_id, tag.name AS tag_name
FROM tag, pagetag
WHERE ? = pagetag.pageid AND tag.id = pagetag.tagid
2008-09-04 21:39:13,255 INFO sqlalchemy.engine.base.Engine.0x..30 [1]
2008-09-04 21:39:13,258 INFO sqlalchemy.engine.base.Engine.0x..30 DELETE FROM page WHERE page.id = ?
2008-09-04 21:39:13,258 INFO sqlalchemy.engine.base.Engine.0x..30 [1]
As you can see, quite a few SQL statements are sent. SQLAlchemy is checking to ensure that there aren’t any comments or tags associated with the page you are deleting.
At this stage, you could commit the changes, but this time let’s try a rollback:
>>> session.rollback()
2008-09-04 21:41:42,989 INFO sqlalchemy.engine.base.Engine.0x..30 ROLLBACK
SQLAlchemy sends a ROLLBACK statement, causing the RDBMS to undo the changes. It is now as if the delete never happened. Once again, you can try to access the test page’s id. Once again, SQLAlchemy fetches the data from the database because the old session was automatically expired after the rollback:
>>> test_page.id
2008-09-04 21:40:30,281 INFO sqlalchemy.engine.base.Engine.0x...55cc BEGIN
2008-09-04 21:40:30,282 INFO sqlalchemy.engine.base.Engine.0x...55cc SELECT page.id AS page_id, page.content AS page_content, page.posted AS page_posted, page.title AS page_title, page.heading AS page_heading
FROM page
WHERE page.id = ?
2008-09-04 21:40:30,283 INFO sqlalchemy.engine.base.Engine.0x...55cc [1]
1
As you can see, the page clearly still exists, so the rollback was successful. Of course, if you exit the Python interactive prompt, all the data will be lost because you are still using an in-memory database, so don’t be surprised if the row is not there if you fire up another Python interactive shell.
You should now have a good understanding of the inner working of the session in the same configuration as you would find in a Pylons application, but there is one complication you haven’t yet dealt with. How do you use the SQL Expression API in the same transaction as a particular session?
Start a new Python interactive prompt, and type the following to set up the tables and session and create a test_page object as before:
>>> from object_test import session
>>> import model
>>> test_page = model.Page()
>>> test_page.title = u'Test Page'
>>> test_page.content = u'Test content'
>>> session.add(test_page)
>>> session.flush()
2008-09-04 21:59:29,852 INFO sqlalchemy.engine.base.Engine.0x..30 BEGIN
2008-09-04 21:59:29,854 INFO sqlalchemy.engine.base.Engine.0x..30
INSERT INTO page (content, posted, title, heading) VALUES (?, ?, ?, ?)
2008-09-04 21:59:29,855 INFO sqlalchemy.engine.base.Engine.0x..30
[u'Test content', '2008-09-04 21:59:29.854464', u'Test Page', None]
I’ve already discussed all the output from this code, so I’ll just say that at this point a transaction has been started and the test page has been flushed to the database within that transaction.
Now let’s write a SQL expression to select that row from the database, even though the changes haven’t been committed. The only way you can do this is if you make sure you use the same transaction as the session. The session has an execute() method for precisely this purpose. Let’s see it in action:
>>> from sqlalchemy.sql import select
>>> s = select([model.page_table])
>>> result = session.execute(s)
2008-09-04 21:59:29,868 INFO sqlalchemy.engine.base.Engine.0x..30 SELECT page.id, page.content, page.posted, page.title, page.heading
FROM page
2008-09-04 21:59:29,868 INFO sqlalchemy.engine.base.Engine.0x..30 []
>>> result.fetchall()
[(1, u'Test content', datetime.datetime(2008, 9, 4, 21, 59, 29, 854464), u'Test Page', None)]
Using session.execute() ensures that the same connection (and hence the same transaction) is used by both the session and the SQL expression object s. For this reason, it is always best to use session.execute() when working with SQL expressions in Pylons rather than creating a separate connection via the engine metadata.
Now that you’ve seen how to create objects and how to use the session to save their data to their corresponding tables, it’s time to look at how to query the database to get data back out using the Object-Relational API instead of the SQL Expression API. Commit the page that has just been flushed, and you will continue the example as you look at queries:
In a Pylons application, if you don’t call session.commit(), any changes you make will be discarded at the end of the request.
Queries
All SQLAlchemy Object-Relational API queries are performed with query objects that are created from the session. The simplest way to create and use a query object is like this:
>>> page_q = session.query(model.Page)
>>> for page in page_q:
...     print page.title
...
2008-09-04 22:13:03,885 INFO sqlalchemy.engine.base.Engine.0x..30 SELECT page.id AS page_id, page.content AS page_content, page.posted AS page_posted, page.title AS page_title, page.heading AS page_heading
FROM page
2008-09-04 22:13:03,885 INFO sqlalchemy.engine.base.Engine.0x..30 []
Test Page
In this example, you have iterated over every page in the database, and SQLAlchemy has created a page object for each so that you can access its .id attribute and print its title. You can see the SQL used and that the title of the test page, being the only page in the database at the moment, is correctly printed.
Let’s take a closer look at some of the properties of the query object. You can use the same query object more than once, so let’s use its all() method to get all the pages in one go as a list of Page objects:
>>> page_q.all()
[<model.Page object at 0x72670>]
Query objects also have a one() method that returns just one object, raising an exception if there are zero or more than one results. Another useful method on query objects is first(), which returns the first result or None if there are no results, again the log output isn’t included:
>>> page = page_q.first()
>>> page.title
u'Test Page'
Query objects also allow you to set a LIMIT and OFFSET by treating the query object as a list that can be sliced. For example, to retrieve results only from 2 to 5, you would write this:
>>> page_q[2:5]
2008-09-04 22:23:49,556 INFO sqlalchemy.engine.base.Engine.0x..30 SELECT page.id AS page_id, page.content AS page_content, page.posted AS page_posted, page.title AS page_title, page.heading AS page_heading
FROM page
 LIMIT 3 OFFSET 2
2008-09-04 22:23:49,556 INFO sqlalchemy.engine.base.Engine.0x..30 []
[]
Of course, you have only one page, so this returns an empty list, but you can see from the logged SQL that LIMIT and OFFSET were applied correctly.
Most of the time, you will want to be more specific about the results you return. SQLAlchemy allows you to do this in a number of ways. First, if you know the primary key of the row you are looking for, you can use the page query’s get() method:
>>> page_q.get(1)
<model.Page object at 0x72670>
Notice this time that SQLAlchemy didn’t need to send any SQL to retrieve this object because it was already in the session from the queries you have already run. Query objects also have filter() and filter_by() methods. Both are similar, but filter() takes an expression of the type you saw earlier, whereas filter_by() takes keyword arguments representing attributes on the class you are querying. Their use is best demonstrated with examples:
>>> titles1 = [page.title for page in page_q.filter(model.Page.id==1)]
2008-09-04 22:40:24,236 INFO sqlalchemy.engine.base.Engine.0x..30 SELECT page.id AS page_id, page.content AS page_content, page.posted AS page_ posted, page.title AS page_title, page.heading AS page_heading
FROM page
WHERE page.id = ?
2008-09-04 22:40:24,236 INFO sqlalchemy.engine.base.Engine.0x..30 [1]
>>> titles2 = [page.title for page in page_q.filter_by(id=1)]
2008-09-04 22:40:40,098 INFO sqlalchemy.engine.base.Engine.0x..30 SELECT page.id AS page_id, page.content AS page_content, page.posted AS page_posted, page.title AS page_title, page.heading AS page_heading
FROM page
WHERE page.id = ?
2008-09-04 22:40:40,101 INFO sqlalchemy.engine.base.Engine.0x..30 [1]
>>> titles1 == titles2
True
The same results are obtained whether the filter() or filter_by() syntax is used.
Tip
You might not have seen the notation used in the previous example to generate both the title lists. It is called a list comprehension and is a handy way of quickly iterating over an object to produce a new list.
It is also possible to use table columns as an argument to filter() rather than object attributes. Here’s an example:
>>> filtered_page_q = page_q.filter(model.page_table.c.title.like(u'%page%'))
>>> page = filtered_page_q.first()
2008-09-04 23:23:33,128 INFO sqlalchemy.engine.base.Engine.0x..30 SELECT page.id AS page_id, page.content AS page_content, page.posted AS page_ posted, page.title AS page_title, page.heading AS page_heading
FROM page
WHERE page.title LIKE ?
 LIMIT 1 OFFSET 0
2008-09-04 23:23:33,136 INFO sqlalchemy.engine.base.Engine.0x..30 [u'%page%']
>>> page.title
u'Test Page'
Notice that the return value from filter() or filter_by() is another query object, so you can further manipulate the results or apply more filters. You can also create more complex expressions using AND, OR, and NOT:
>>> from sqlalchemy.sql import and_
>>> page = page_q.filter(and_(model.Page.title.like(u'%page%'), model.page_table.c.id==1)).first()
2008-09-04 23:24:51,196 INFO sqlalchemy.engine.base.Engine.0x..30 SELECT page.id AS page_id, page.content AS page_content, page.posted AS page_posted, page.title AS page_title, page.heading AS page_heading
FROM page
WHERE page.title LIKE ? AND page.id = ?
 LIMIT 1 OFFSET 0
2008-09-04 23:24:51,196 INFO sqlalchemy.engine.base.Engine.0x..30 [u'%page%', 1]
>>> page.title
u'Test Page'
Notice that you can use either attributes of the class or columns of the table in the query. Using this technique you can even use SQL strings, bind parameters, or complex statements built using the SQLAlchemy expression language select() function. See the SQLAlchemy documentation for details.
Working with Objects
The great thing about using the SQLAlchemy Object-Relational API is that you get actual Python objects returned from the queries rather than values. Any changes you make to the objects are then automatically reflected in the underlying database when you commit changes to the session. This means that working with the database becomes just like working with ordinary Python objects.
Let’s start by changing the title of the page object you’ve just selected:
>>> page.title = u'New Title'
>>> session.commit()
2008-09-04 23:27:13,893 INFO sqlalchemy.engine.base.Engine.0x..30 UPDATE page SET title=? WHERE page.id = ?
2008-09-04 23:27:13,893 INFO sqlalchemy.engine.base.Engine.0x..30 [u'New Title', 1]
2008-09-04 23:27:13,896 INFO sqlalchemy.engine.base.Engine.0x..30 COMMIT
As you can see, SQLAlchemy automatically generated an UPDATE statement to update the column and then committed the change.
Now let’s think about how you could add a comment to the page. One approach would be to insert a new row into the comment table using the SQL Expression API, ensuring that the pageid field contained the value 1 so that the comment was associated with the correct page via a foreign key. This would work perfectly well, but the Object-Relational API provides a better approach:
>>> comment1=model.Comment()
>>> comment1.name = u'James'
>>> comment1.email = u"james@example.com"
>>> comment1.content = u'This page needs a bit more detail ;-)'
>>> comment2=model.Comment()
>>> comment2.name = u'Mike'
>>> comment2.email = u'mike@example.com'
>>> page.comments.append(comment1)
>>> page.comments.append(comment2)
>>> session.commit()
2008-09-04 23:38:52,900 INFO sqlalchemy.engine.base.Engine.0x..30 INSERT INTO comment (pageid, content, name, email, created) VALUES (?, ?, ?, ?, ?)
2008-09-04 23:38:52,901 INFO sqlalchemy.engine.base.Engine.0x..30 [1, u'This page needs a bit more detail ;-)', u'James', u'james@example.com', '2008-09-04 22:12:24.775929']
2008-09-04 23:38:52,903 INFO sqlalchemy.engine.base.Engine.0x..30 INSERT INTO comment (pageid, content, name, email, created) VALUES (?, ?, ?, ?, ?)
2008-09-04 23:38:52,904 INFO sqlalchemy.engine.base.Engine.0x..30 [1, u'', u'Mike', u'mike@example.com', '2008-09-04 22:12:24.775929']
2008-09-04 23:38:52,907 INFO sqlalchemy.engine.base.Engine.0x..30 COMMIT
You have created the comment objects in a similar way as you created the test_page object earlier in the chapter, assigning various attributes appropriate values. The interesting thing here is that rather than having to manually set the .pageid attribute on each of the columns with the id of the page, you simply appended the comments to the page’s .comments attribute. Really, the comments should have been added to the session with session.add_all([comment1, comment2]), but SQLAlchemy was smart enough to realize that if they had been appended to an object that was already in the session, then they needed to be added too. When session.commit() was called, the autoflush=True option to the session caused the session to be flushed, and the SQL for the two required INSERT statements to be sent to the database before being committed.
This behavior is possible only because of the relationships that were defined when the tables and mappers were created in the model.py file earlier in the chapter. If you recall, the mapper for the page table looks like this:
orm.mapper(Page, page_table, properties={
   'comments':orm.relation(Comment, backref='page'),
   'tags':orm.relation(Tag, secondary=pagetag_table)
})
Notice that you specified a backref called page on the Comments class. This means you should be able to access the page object from a comment’s .page attribute as well as accessing a list of comments from a page’s .comments attribute. Let’s see:
>>> comment_q = session.query(model.Comment)
>>> comment = comment_q.get(2)
2008-09-04 23:53:21,084 INFO sqlalchemy.engine.base.Engine.0x..30 BEGIN
2008-09-04 23:53:21,085 INFO sqlalchemy.engine.base.Engine.0x..30 SELECT comment.id AS comment_id, comment.pageid AS comment_pageid, comment.content AS comment_content, comment.name AS comment_name, comment.email AS comment_ email, comment.created AS comment_created
FROM comment
WHERE comment.id = ?
2008-09-04 23:53:21,086 INFO sqlalchemy.engine.base.Engine.0x..30 [2]
>>> page = comment.page
2008-09-04 23:53:28,047 INFO sqlalchemy.engine.base.Engine.0x..30 SELECT page.id AS page_id, page.content AS page_content, page.posted AS page_posted, page.title AS page_title, page.heading AS page_heading
FROM page
WHERE page.id = ?
2008-09-04 23:53:28,048 INFO sqlalchemy.engine.base.Engine.0x..30 [1]
>>> page
<model.Page object at 0x72670>
>>> page.id
1
>>> page.title
u'New Title'
As you can see, it is the same page with the updated title. You’ll see a lot more of the Object-Relational API as you read the SimpleSite tutorial chapters. As well as seeing how SQLAlchemy works in the context of a Pylons application, you’ll see how to work with tags as an example of a many-to-many relationship, how to use ORDER BY clauses with query objects, and how to hook SQLAlchemy up to FormEncode to validate data.
Declarative API
SQLAlchemy 0.5 also has a Declarative API that offers a higher-level API to allow you to define on one go the same classes, tables, and mappers you added to your model.py file earlier in the chapter. For many applications, this is the only style of configuration needed.
Let’s rewrite the model.py file using the Declarative API:
import datetime
from sqlalchemy import schema, types, orm

metadata = schema.MetaData()

def now():
    return datetime.datetime.now()

from sqlalchemy.ext.declarative import declarative_base

# Assign the same metadata object we created earlier.
Base = declarative_base(metadata=metadata)

# We still need the pagetag table because we don't want to explicitly define a
# Pagetag class but still
# need to specify the table in the relation between pages and tags.
pagetag_table = schema.Table('pagetag', metadata,
    schema.Column('id', types.Integer,
        schema.Sequence('pagetag_seq_id', optional=True), primary_key=True),
    schema.Column('pageid', types.Integer, schema.ForeignKey('page.id')),
    schema.Column('tagid', types.Integer, schema.ForeignKey('tag.id')),
)

class Page(Base):
    __tablename__ = 'page'

    id = schema.Column(types.Integer,
        schema.Sequence('page_seq_id', optional=True), primary_key=True)
    content = schema.Column(types.Text(), nullable=False)
    posted = schema.Column(types.DateTime(), default=now)
    title = schema.Column(types.Unicode(255), default=u'Untitled Page')
    heading = schema.Column(types.Unicode(255))
    comments = orm.relation("Comment", backref="page")
    tags = orm.relation("Tag", secondary=pagetag_table)

class Comment(Base):
    __tablename__ = 'comment'

    id = schema.Column(types.Integer,
        schema.Sequence('comment_seq_id', optional=True), primary_key=True)
    pageid = schema.Column(types.Integer,
        schema.ForeignKey('page.id'), nullable=False)
    content = schema.Column(types.Text(), default=u'')
    name = schema.Column(types.Unicode(255))
    email = schema.Column(types.Unicode(255), nullable=False)
    created = schema.Column(types.TIMESTAMP(), default=now())

class Tag(Base):
    __tablename__ = 'tag'

    id = schema.Column(types.Integer,
       schema.Sequence('tag_seq_id', optional=True), primary_key=True)
    name = schema.Column(types.Unicode(20), nullable=False, unique=True)

page_table = Page.__table__
As you can see, this example uses many of the same principles you’ve already learned about but in a more compact form. The table name has to be specified via a __tablename__ attribute, but SQLAlchemy can infer the column names from the attribute names you’ve specified. When setting up the relationships, you can pass a string to relation() rather than a class because you might need to map a relationship before the class has been defined.
Classes that are mapped explicitly using mapper() can interact freely with declarative classes, and table definitions created explicitly can be used too, as you can see with the pagetag table in the previous example.
Declarative classes get access to the underlying metadata object, and hence the underlying engine, because they are inherited from Base, and Base has access to metadata because it is passed as an argument to the declarative_base() function.
The underlying Table object created by the declarative_base() version of each of these classes is accessible via the class’s __table__ attribute, as you can see from the last line in the example.
If you save the updated model.py, you will find that all the examples using the object_test module still work in the same way, even with the new model.
Although the Declarative API can be more approachable to newcomers, most Pylons developers at the moment still choose to use the more explicit APIs you saw earlier, which is the approach you’ll follow for the rest of the book. If you are interested in using the Declarative API, you should read the SQLAlchemy documentation at http://www.sqlalchemy.org/docs/05/plugins.html#plugins_declarative.